Office 365 for Education
Using Lync in a school or education institution
Lync is a communication tool that can connect you to people inside and outside of your institution. It includes instant messaging (IM) and Lync video conference meetings.
- With IM you can see when your co-workers are online because their colour changes depending on what they are doing.
- You can start an IM conversation directly from your contacts (the People tab on the Office 365 menu) as well as schedule a video conference or meeting.
- With Lync you can set up meetings where you share screens, make notes of discussions in real time and work collaboratively on documents.
- You can use the Outlook.com* calendar and contacts (People tab) to use IM and schedule Lync meetings.
After working through this guide, you will be able to:
- Guide your users on how to download and set up Lync on their devices
- Provision your institution users so that they can access Lync and be able to use it
- Allow external users to connect with your domain Lync meetings
- Understand how to use the features of Lync in your institution
- Use instant messaging to have real-time text conversations with colleagues and students
- Set up and run a Lync meeting, share your desktop and files and collaborate in real time
- Think about how you could use Lync to help enhance learning and teaching
Unlike the other Microsoft Office 365 applications, Lync installs from the Office 365 portal onto the computer or device you’re using. If you don’t already have Lync, you will need to download it. You can do this the first time you are invited to a Lync meeting. Alternatively, go to Office 365 and click on the Settings icon (the wheel shaped one on the right of the top Office tabs menu bar). This takes you to the Office 365 settings screen. On the left menu, click on Software and install the latest versions of Office tools. If you are unable to do this, click on Lync on the same left menu.
You will then be able to set up meetings using the Lync Web Scheduler by following the simple step by step instructions. You will also be able to use the Lync Web App to attend meetings and contribute to the discussions - it will load automatically when you accept invitations and meetings links.
Using the Lync Web Scheduler creates a list of your scheduled meetings and gives you a link to each meeting that you can email to your participants.
Provisioning users in Office 365 for using Lync
The basic setup of Lync Online is very simple. You need to decide if you’re going to allow meeting and messaging only within your institution or outside of it as well. If you want to connect to outside users, do you want to make connections available to the whole of the Lync network or only nominated people?
- You will already be set up to use Lync and instant messaging (IM) unless your institution administrator unticked the box while setting up the Office 365 tenancy.
- If you find you cannot use Lync, contact your administrator for help. It is a simple admin exercise to deal with this using the Lync settings from the admin dashboard in Office 365.
- The dashboard looks like this:
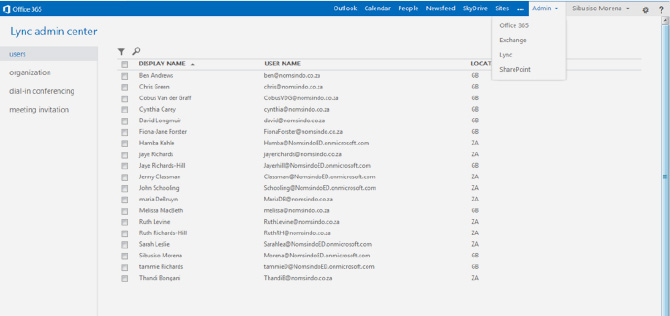
- Ticking the box next to a user name brings up a list of available Lync service features on the right side of the screen.
- Clicking on the pencil icon allows the administrator to make changes these services.
If you want to allow users in your institution to be able to use Lync to connect with external users, you need to set this up.
- Go to the admin drop-down menu and select Lync. This takes you to the Lync Admin Centre.
- From the left side menu, select organisation and then external communications.
- In the drop-down menu, select the on except for blocked domains option, and enter any domains you wish to block in the box below.
- Scroll down to the bottom of the page and click Save. Your changes will now take effect.
Scheduling a Lync meeting using Outlook
You can use the Outlook.com calendar or contacts (People) to set up and start a Lync online meeting. Alternatively you can open Lync directly after you have downloaded it from Office 365, or use the Lync Scheduler tool if you can’t download it.
Scheduling a meeting in Outlook is a simple matter of following the steps and instructions that appear on your screen. As you are now more experienced in using Office 365 after using these guides, the commands and functions will have become more familiar to you.
- Go to Calendar and click on +new event.
- Go through the form and fill in the details of your meeting including the attendees and the venue.
- Use Scheduling Assistant to check for calendar clashes among the attendees.
- As this is to be a Lync Video Conference meeting, click the Online meeting icon.
- This generates a hyperlink to your meeting, which you can send out to the attendees by Outlook email.
- Clicking on this hyperlink starts the Lync Web App loading. Attendees will now be able to join the meeting, use the shared whiteboard, work through PowerPoint presentations, share screens and make live meeting action plan notes.
- Anyone can be a participant, even people outside your organisation who don’t have Lync installed, as they will automatically get directed to the Lync Web App client together with instructions.
Using the Lync Web Scheduler
- This is an alternative to scheduling Lync meetings in Outlook.
- Go to your Office 365 settings and select Software, then click on Lync on the left menu.
- You now have the option to launch the Lync Web Scheduler by clicking on the hyperlink.
The screen will now look like this:
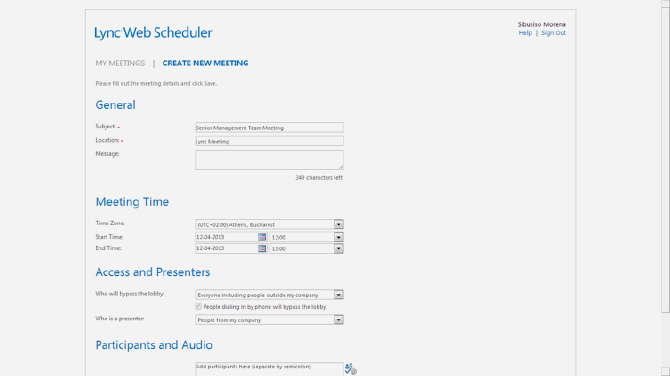
- Completing the details sets up your meeting. A link is then generated for you to send out to all the participants.
- A summary of your meeting will appear on the screen. It looks like this:
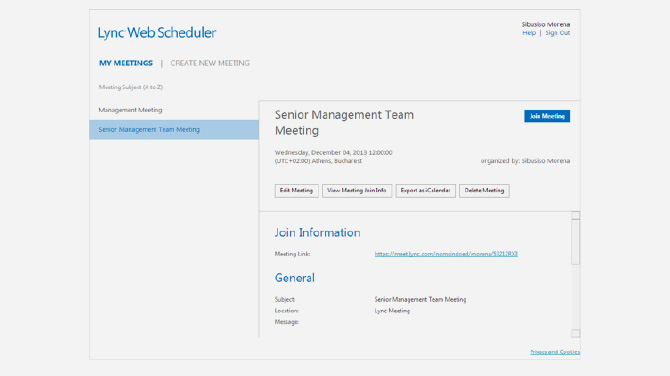
- The people you invite to the meeting simply need to click on the link to join.
- Lync will load for them, either using the version installed on their machines or via the Lync Web App. They will have the same functionality either way.
Using Lync and instant messaging for meetings
- When it is time to start your planned meeting, invitees click on the link they have received and join the meeting.
- The meeting screen will load in Office 365 Lync. The main functions are at the bottom left side of the meeting screen (IM, presentation materials, participant list and actions)
- There are also a few icons at the top right side of the screen (settings, touch-screen, help and meeting exit)
- You can send instant messages (IMs) to the meeting participants during the meeting. However, your messages will be sent to all the attendees - you can’t send IMs to individual participants. Click on the message button to open an IM window. Type your message and click on Enter to send the message.
Other functions and tools in Office 365 Lync to help you with your meetings
- Click on the phone/mic button to access the audio controls menu. You can mute/unmute yourself and control your audio volume from this menu during the meeting.
- If your camera is connected and set up, you can choose to share your video with other meeting participants making Lync more like a face-to-face meeting experience. Click on the camera button to preview your video. If you are happy to use video and share with other participants, select Start My Video.
- The present icon (the monitor-shaped button) allows you to share content and run the meeting. Other participants can also take over presenting using this command. The screen might now look like this if you are exploring all of the functions:

- If you’re a presenter in the meeting, you can share content with the other participants by using this monitor button, and then selecting the type of content you want to share from the Present tab - your device desktop screen, an open programme on your device, a PowerPoint presentation, a blank whiteboard that all participants can write on, or a poll.
- Use the OneNote tab to access the OneNote notebooks shared by Lync 2013 users in the meeting. Use the Attachments tab to send attachments to the meeting participants that they can download to their devices.
- If you’re a presenter, you can use the People button to manage the meeting privileges of participants during
the meeting. - On the Participants tab, you’ll see all the presenters and attendees in the meeting listed in separate groups. Next to each participant’s name, you’ll see icons that indicate the status of their IM, audio, video and sharing capabilities.
- To change a participant’s privileges, right click or double click a participant’s name to display the participant options. You can then choose to mute/unmute, remove, or make the participant a presenter or attendee.
- The settings icon (the wheel-shaped symbol) at the top right of the page gives you some more advanced options. Explore these, but don’t worry too much about them at the moment.
- Select the hand button to switch between touch screen and mouse/pad navigation modes. If you’re using Lync on a touch screen device, touch mode is on automatically.
- Clicking on the ? icon opens the help menu where you can find tips for using Lync and answers to any questions about how to use all of the different meeting functions.
- If you hover your cursor over the icons at the bottom right of the page, you will find the Gallery function. The gallery is the part of the screen where the videos or static pictures of the meeting participants are displayed. To change the layout for the gallery, click on the Pick a Layout button. You can choose from Gallery View, Speaker View or Presentation View, so explore these options and see which one you prefer.
You are now ready to have your first meeting. Why not set up and schedule a test meeting with a few of your colleagues so that you can all try out some of the functions and discover how Lync meetings might work for you?
*Formerly known as Outlook Web App.
Lync and instant messaging - Further Reading
» Using Lync in your school or education institution» Scenario: Scheduling a Lync meeting
» Scenario: Student revision session
» Scenario: Using a Lync meeting
» Scenario: Using IM for out of school help
Download the full guide