Office 365 for Education
User Scenario:
Setting up email distribution groups in Exchange and Outlook
This user scenario looks at using groups for scheduling meetings and keeping in contact with parents and caregivers, but email groups have lots of other uses.
- Mrs de Bruyn is the deputy head who manages admin in her school. She is able to work on Exchange because she is an administrator of her institution’s Office 365 account.
- She knows there are many functions that a school will not need to use, so she isn’t worried that Office 365 Exchange appears to be quite complex.
- The main reason why she wants to use Exchange is to set up email distribution groups for her institution such as Staff, Students, Year Groups and Departments.
- She goes to her Office 365 Admin Dashboard and clicks on the Admin tab from the top Office 365 tabs menu.
- From the drop-down menu, she selects Exchange. This opens the Exchange admin center.
- She sees lots of different functions but knows that she really won’t need to use most of what she sees there, as most of them are for business users. In time she will become more confident and feel able to explore.
For now, she is going to go through the steps involved in setting up email groups. This makes it easier to send out bulk email. Some of the reasons her institution might use groups for are:
- Sending out regular staff communications
- Email updates to students and parents or caregivers
- Setting up year groups for students’ email
- Setting up school leadership team email
- Sending out regular email to specific departments or faculties
- Email for members of working groups or ongoing projects
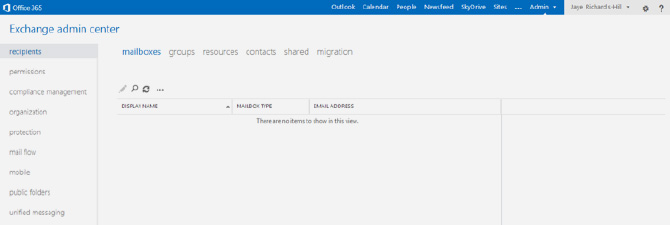
Her screen will look like this:

- Mrs de Bruyn clicks on groups on the top tabs menu.
- Adding a new group is simply a matter of following the on-screen instructions as in previous guides.
- She selects the + icon. A drop-down menu appears.
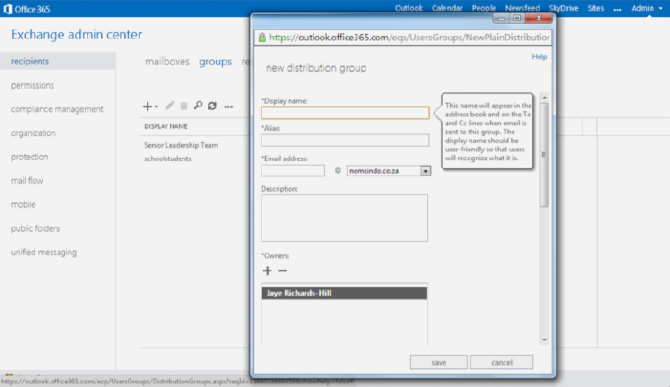
- Clicking on distribution group from the choices opens up a new window on her screen. It will look like this:

- She works though the fields to create a distribution group for her school leadership team.
- The Alias is a shortened version of the group name. This will save time when typing the group name into the recipient box each time.
- She uses a shortened part of the group name for the email address, for example ‘leadership’.
- As she is setting up the new group, she is the group owner by default. She can add other owners who will also be able to carry out administration functions such as adding new users or deleting users who have left the institution.
- When she is happy with this, she clicks save. Office 365 Exchange will now set up her group. It will appear in the list of other groups that have already been set up by other administrators.
- She can bulk add members to the group by hovering over the text and double clicking on the pencil icon that appears to the right of the group name. This opens up the editing functions box on her screen. A quick way of adding individual new users is to click just once on the icon.
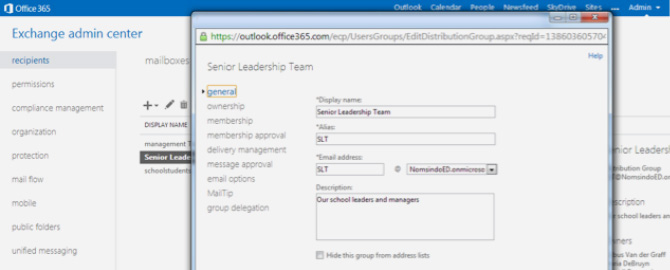
The editing box will look like this on Mrs de Bruyn’s screen:

- Mrs de Bruyn now works through the instructions using the menu on the left of the box to review the owners, add new members (including herself), change the approval settings and other group settings and email properties.
- She finds the instructions self-explanatory and only needs to use the help function (at the top right corner of the setup box) once.
- She clicks save when she is happy and Office 365 Exchange then makes the changes to her distribution group members and settings.
- The group is now ready for use and so Mrs de Bruyn decides to send out an email using the group email function to let the other members of the group know that she has set it up.
She now goes to the main Office 365 tabs menu that runs across the top of the page and clicks on Outlook. This opens up her email page.
- She clicks on +new mail. The email window opens up on the right of her screen.
- In the To line, she starts to type the group name. As she does this, Outlook recognises the group and the name appears as a recipient prompt for her to select.
- She types up her email and clicks send.
- Almost immediately, she receives a copy of the email as she is a member of this distribution group and so she knows her message has been sent successfully. She sees that she needs to let her team know about their next meeting.
- Mrs de Bruyn clicks +new mail again and starts to type in the name of the group. She selects it when the prompt for the group name appears again.
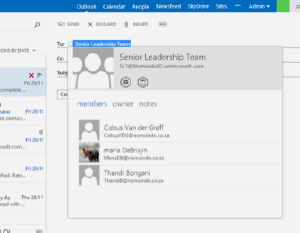
- She finds that if she clicks once on the text containing the group name, another box appears on her screen displaying a list of the group members.
- This box also contains some other useful functions, which Mrs de Bruyn explores. The box on her screen looks like the image on the right.
- She hovers over the calendar icon above the display names and discovers she can use this function to schedule a meeting.
- She selects this and is given the options for scheduling her meeting. She completes the blank spaces in this box, and uses the more functions icon (the three small dots) to attach the agenda as a Word document.
- She clicks on Scheduling Assistant to view her own calendar for her availability. She can also use this function to see if other members of the distribution list are free to attend because their calendars become visible as she enters their names or the distribution group in the Attendees line. Once she is satisfied, she clicks send.
- When she views her own calendar, she sees that Office 365 has listed the meeting. Clicking on the text opens up the event and she sees that all recipients can reply to her and view the attached agenda as well as viewing all of the other attendees.

Office 365 works across her email contacts and calendar to make her job much easier and saves her time and effort.
- She no longer needs to make manual calendar entries and individual emails every time she schedules a meeting.
- When she receives an email notifying her of an event she needs to attend she can enter it into her calendar at the click of a button.
- She is able to see at a glance when other members of her team are available or otherwise occupied when she enters their names into the Attendees line of the Scheduling Assistant as their calendar availability is automatically shown.
- This also saves her administration time and effort when scheduling events for multiple attendees.
- Her email recipients and groups appear as prompts as soon as the first one or two letters of their names are typed into the recipient line of a new email.
Setting up an email distribution group for parents and caregivers
- Mrs de Bruyn now decides to set up a distribution list for the parents and caregivers of her school students.
- She has all of their details on a .csv file and wants to do a bulk upload to save time.
- This is easy to do using Office 365 by adding these names to her contacts list. She cannot do this using the Exchange admin center as she did for the school leadership team because the parents do not have Office 365 accounts.
- She selects People from the main Office 365 tabs at the top of her screen.
- She then goes to the settings icon (the wheel-shaped one next to her name at the top of the screen).
- A drop-down menu appears and she clicks on Import contacts. Her screen looks like this:

- She is now given the option to upload a .csv file containing all the names and email addresses of her school’s parents and caregivers. The screen now looks like this:

- She selects Step Two as she already has a .csv file prepared. She follows the instructions as they appear on her screen and completes the bulk upload.
Note: In order to upload your .csv file to Outlook you need to save it correctly in the .CSV (DOS) MS format. Use the Save As drop-down menu that appears when you first save your file to your computer. - Now that her parent list has been uploaded into her contacts, Mrs de Bruyn can set up an email distribution group in Outlook by going to People again and clicking on the + icon to the top left of the page.
- She is now given the option to create a new contact or group. She selects create group.
- She gives her group a name and starts to add contacts by searching for the parents’ details.
- When all the parents’ names have been added, she clicks save to create her distribution group.
Email, contacts and calendar - Further Reading
» Email, calendars and contacts» Scenario: Connecting other accounts to email
» Scenario: People and contacts
» Scenario: Setting up and using distribution groups
» Scenario: Staff communication and info gathering
» Scenario: Staff professional development
» Scenario: Using and sharing calendars
Download the full guide