Office 365 for Education
User Scenario:
Connecting other accounts to Office 365 Outlook email
Cobus is a teacher at the school. He has been using Office 365 for a while and is now ready to connect his other email accounts to Office 365 Outlook and to import his contacts from email and social media platforms he uses, including LinkedIn.
He has Hotmail and Gmail accounts he wants to connect, and he also has another Outlook account. Cobus would like all of his email in one place, and be able to send and receive email.
1. Connecting Hotmail and Gmail to Office 365
- Cobus goes to Outlook.com from his Office 365 dashboard.
- He clicks on the settings icon (shaped like a wheel near the top right of the page) and from the drop-down menu, selects options and then accounts. His screen now looks like this:


- He clicks on connected accounts. He now has the option to connect up to five email accounts to his Office 365 Outlook account.
- He sees that he can also set up his email to be forwarded from Outlook to another account when he needs this.
- He is now ready to connect his Hotmail and Gmail accounts. He clicks on the +icon and follows the instructions that appear on the screen.
- He enters his Hotmail email address and password, and Outlook connects the accounts.
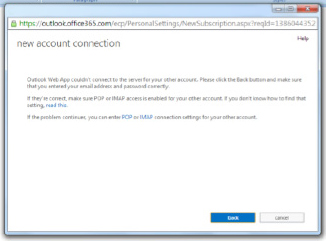
- Cobus repeats these steps for his Gmail account but is unable to connect them. He sees the message on the right.
- To connect his Gmail account, he must go to this account and change the settings to enable POP3 access, which will then allow him to connect it to his Office 365 Outlook account.
This is the process Cobus follows:
- Sign in to your Gmail account.
- Click Settings > Forwarding and POP/IMAP.
- Under POP Download, select one of the following options:
- Enable POP for all mail (even mail that's already been downloaded) - If you select this option, all old and new email will be downloaded to your Outlook.com account.
- Enable POP for mail that arrives from now on - If you select this option, only new email will be downloaded to your Outlook.com account.
- If you want Gmail to keep a copy of mail sent to your Gmail email address in your Gmail inbox, under When messages are accessed with POP select Keep Gmail’s copy in the inbox.
- Click Save Changes.
Cobus then tries again to connect his Gmail account to his Office 365 Outlook. He finds that he needs to go to his Gmail account and follow the instructions in the email from Gmail about connecting accounts. He then tries to connect his Gmail account to Outlook and is successful.
2. Importing his existing Outlook email into Office 365 Outlook
As Cobus already uses Microsoft Outlook as one of his email accounts, he now wants to import all of his emails and contacts to Outlook.com. He checks to see which version he is using (the import mechanism is slightly different for each version) and follows the step-by-step instructions he finds at office.microsoft.com.
3. Connecting social media accounts and importing contacts

- Cobus scrolls down to the bottom of the connected accounts screen. He sees the list of social media sites his school Office 365 platform will allow him to connect with.
- He finds he is able to connect his LinkedIn account and so clicks on connect (to the right of the LinkedIn icon).
- Office 365 then imports his contact list from LinkedIn. He goes to the People tab on the Office 365 tabs menu and finds that all of his contacts have now been imported and are available to use.
- On the right of this connected accounts screen, Cobus notices a list of links to other features of Outlook.com.
- He explores some of these links and finds easy to follow instructions and guides for using some more of the features in Outlook.com.
- On the left he sees the main administration options for Outlook running down the screen and he then explores some of
these as well. - Cobus is able to set up personal email distribution groups of his own (his students by class and department colleagues, for example) as well as seeing which distribution groups he has already been listed in by other administrators at his institution.
- Clicking on the left pointing arrow icon at the top left of his screen returns him to the main Outlook.com email page.
Now that all of his email is in one place and his contacts have been imported, he can view and work with his contacts lists by clicking on People on the Office 365 tabs menu.
He can update or remove any of his connected accounts by going back to the Outlook.com screen and going to settings and then options in the same way as he set up his connected accounts to start with.
He notices that with Office 365 he can reply to any email from someone else in the school domain by instant messaging (IM).
- With an email open in Outlook.com, he clicks on the three small dots at the top right of the screen.
- Hovering over this icon gives more functions. He clicks on it.
- A drop-down menu appears, giving him a list of extra email functions and options.
- Clicking reply by IM opens up a window where he can type a reply that will be delivered to the sender if they are logged in to Office 365.
Email, contacts and calendar - Further Reading
» Email, calendars and contacts» Scenario: Connecting other accounts to email
» Scenario: People and contacts
» Scenario: Setting up and using distribution groups
» Scenario: Staff communication and info gathering
» Scenario: Staff professional development
» Scenario: Using and sharing calendars
Download the full guide