Office 365 for Education
User Scenario:
Using the People tab to work with your contacts in Office 365
Cobus van der Graf is a part of his school senior leadership team. Since his institution has started using Office 365 he has found it excellent for learning and teaching, and very useful for making his administrative tasks more efficient.
Cobus has recently been allowed some time to spend on organising professional development for his colleagues.
He wants to work with them on how to use Office 365, but he realises that he needs to improve his own knowledge
and skills first.
He has not spent much time working with the People tab on the main Office 365 menu so he decides to explore this function a little more.
He clicks on the People tab and explores the screen.
- He can see a list of places where he can find contact information running down the left of the screen.
- He can connect his Social Media accounts and import all of his contacts from these sites.
- He can also use the search function at the top of the screen to find people to add to his contacts list.
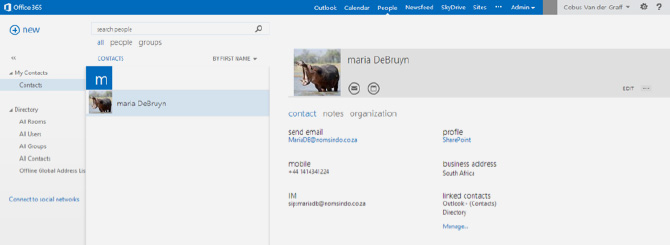
- Clicking on a contact from his list brings up a contact card containing all of their information, which he can also edit.
1. Contact information
- Information is stored in the form of mini contact cards. Cobus opens up the contact details for one of his colleagues. The screen looks like this:

- Looking around the contact card, Cobus can see various options. Hovering his cursor over the icons reveals information about their functions.
- He can send email (and instant messages) and schedule meetings directly from his contact cards.
2. Creating a new contact card
- Cobus clicks on the +add new icon. He is then given the option to create a new contact or group.
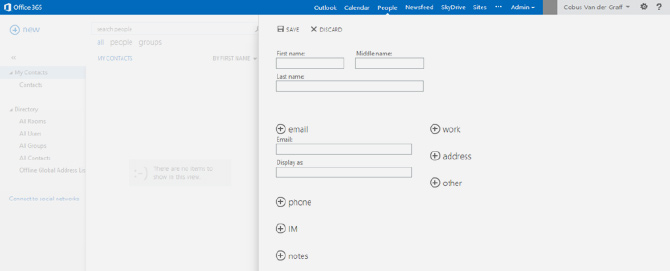
He selects Create Contact. - He is now asked to complete a new contact information form. His screen looks like this:

- Cobus fills in all of the fields. He can select the + icon to see more options for that type of information. For example, if the person he is adding to his contacts has multiple phone numbers, he can select the + icon next to Phone to add phone numbers.
- He then clicks save and his new contact is created. He can find this information again from his contacts list in People or in Outlook when sending email.
3. Creating groups of contacts
If he wants to create a group of contacts, the procedure is very similar. This will be a personal group rather than a shared distribution group created in Office 365 Exchange that everybody can use.
- He clicks on the +add new icon and then on the create group option.
- He completes the details, giving his group a name and adding individual contacts.
- Office 365 offers him prompts as he starts to enter the names of his group members.
- He clicks on save when he has finished and Office 365 now creates his personal contacts group for him.
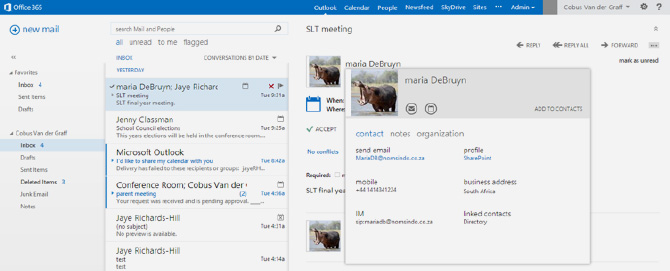
When Cobus is reading an email, if he clicks on the name of the sender, a contact card appears on his screen.
It looks like this:

- He notices an option to add the sender to his contacts at the top right of this contact card.
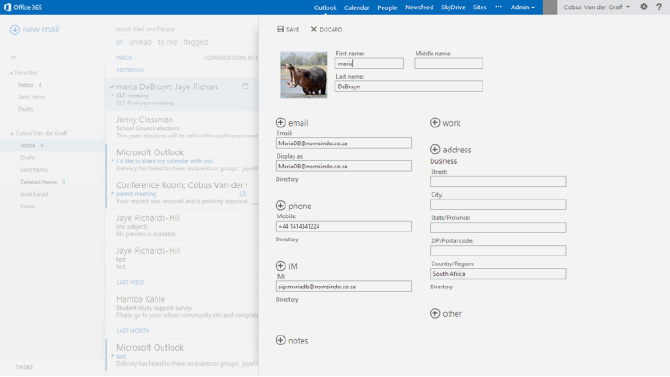
- He clicks on this and a new window opens where he can add any further information. The screen looks like this:

- He clicks on save and the sender and their details are now saved to his contacts.
4. Improving and enhancing communication
- In Outlook Cobus can see Lync presence indicators next to every email address.
- He can see at a glance which colleagues are online and available.
- Hovering over the name shows him the different methods he can use to get in touch with that person.
- If they are online, he can start a conversation with them using IM or even an impromptu Lync meeting.
Email, contacts and calendar - Further Reading
» Email, calendars and contacts» Scenario: Connecting other accounts to email
» Scenario: People and contacts
» Scenario: Setting up and using distribution groups
» Scenario: Staff communication and info gathering
» Scenario: Staff professional development
» Scenario: Using and sharing calendars
Download the full guide