Office 365 for Education
Setting up and using Yammer
Social networking has changed the way people interact with each other, not just at home and in the workplace but also in schools, colleges and universities. Teachers and educators across the world are embracing the potential of digital tools to make learning more relevant and engaging. Education institutions are no longer debating whether online networking should play a role in the classroom, and instead the debate has shifted to which social networking tools work best for education and how to deploy them to enhance learning and teaching as well as for administration and staff communications. |
Yammer is a social network that is now included with Office 365 for Education.
Here are some of the great features available to you with Yammer:
- Yammer is a social media networking service that is similar to Facebook and Twitter.
- Unlike these other social networks, however, Yammer is only accessible to users who have been set up with an account in your institution, and it is therefore a completely safe and secure internal social network for your education institution.
- You must have an email address associated with your domain name in order to be able to use your institution’s Yammer network, however, external networks can be created in order to allow users from outside of your institution to connect with your users.
- You can change the design and brand your Yammer service to fit the look and feel of your education institution.
- Yammer can be used to send and receive messages, share images and other files, and keep all the users in your institution connected.
- You can set up file repositories from which users can download important documents.
- You can collaborate on group, class or team pages.
- Posts and keywords can be #hashtagged to make searching easier and more effective. Yammer posts also appear in all SharePoint searches you make.
- Yammer can be used for quick communication with colleagues and students, and could help to reduce the amount of email you send out in your institution.
- Your users can use Yammer on almost any device and platform, and there are apps for cell phones and tablet devices using Windows 8, iOS and Android. Users can be connected 24/7!
- There is a selection of useful apps that can be added to your Yammer service.
Yammer is replacing the Newsfeed component of Office 365 in all new education accounts, and can be activated if you are already using Office 365 in your school or education institution. This guide will take you through the process of changing your existing Newsfeed to Yammer, and then setting it up so that all your users will be able to start working with it.
New Office 365 for Education plans come with Yammer activated. You will find it on the blue toolbar at the top of your Office 365 homepage. If you already had an Office 365 account before 1 April 2014 you will need to change to Yammer yourself.
1. Convert your existing Newsfeed to Yammer
This is a quick and easy process and it will not take long to follow these steps.
- Log into Office 365 and go to your admin center dashboard.
- Select the Admin tab and choose SharePoint from the drop-down menu.
- Your screen will now look like this:
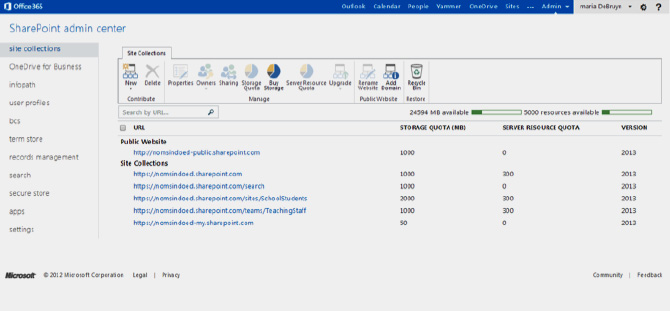
- Select settings from the menu on the left of the screen.
- You will see that the default setting to use Newsfeed is selected, indicated below by the arrow:
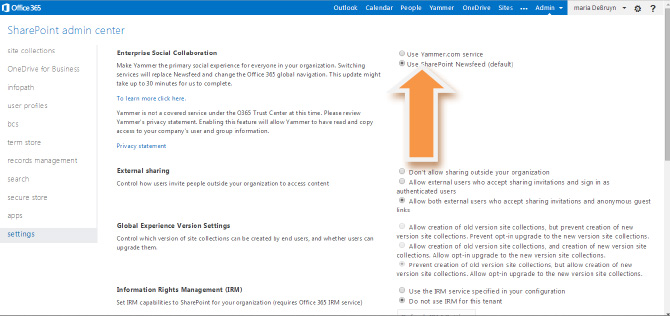
- Select Use Yammer.com service. Scroll down to the bottom of the page and click on OK.
- After about 30 minutes your Yammer service will be activated. Sometimes it doesn’t even take that long.
- Log out of Office 365. When you log back in, you will notice that Newsfeed on the top blue toolbar has changed to Yammer.
- You are now ready to start setting up and using Yammer in your education institution.
2. A good Yammer profile helps others to connect with you
- When you click on Yammer on the top blue toolbar, you will be prompted to set up your profile. Just follow the steps as they appear on the screen and add your personal details.
- You will be asked for the names of some of your co-workers. These will be other users in your education institution. When you add their names they will be sent an invitation email.
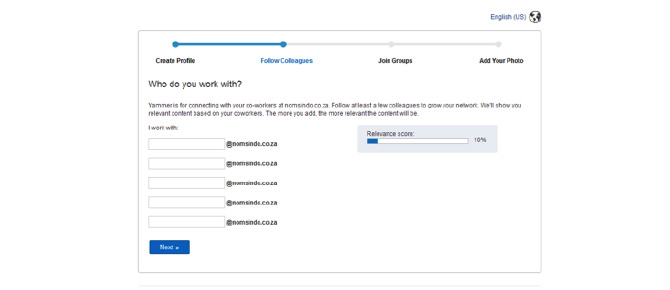
- You can skip this step by clicking on Next at the bottom of the screen.
- The next screen contains suggested Groups for you to join or start. This guide will cover Groups in more detail later, as this is one of the features of Yammer that works so well in education.
- When you have completed the signup process you will be taken to your home screen, which will look similar to this:
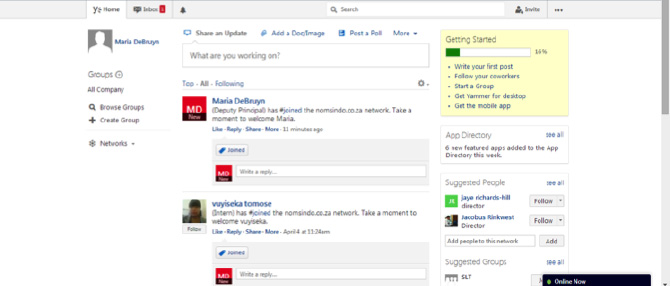
- Along the top of the screen you will find the commands you will use most often. These remain on your Yammer screen at all times.
- Your Inbox contains all messages sent to or from you, together with any private messages you might have sent or received.
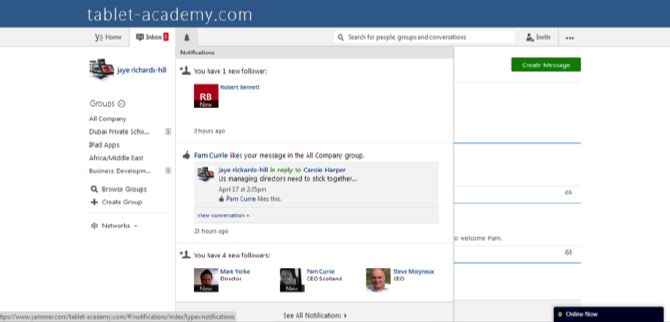
- If you click on the bell icon you will find notifications of new posts and messages as well as people starting to follow you and your posts. A typical screen looks something like this:
- Selecting Home from wherever you are returns you to your home screen.
- Use the Search box to search for both people in your institution to follow and topics of interest.
- Click on Invite to search for and invite other users in your institution’s Office 365 platform to get them started on Yammer.
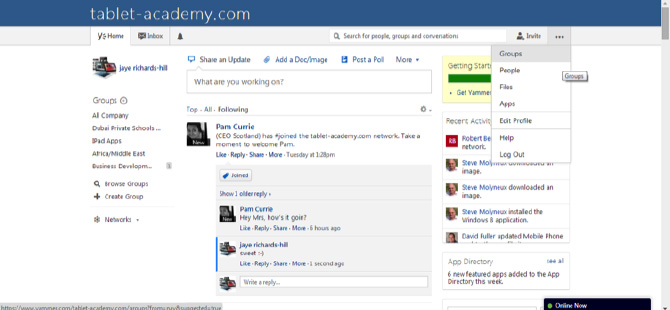
- Clicking on the three dots at the right end of the toolbar opens a drop-down menu with more functions.
- Go through these options in the drop-down menu to see what they all do. They are very simple to follow.
- Groups, People and Files give you information about who you are following, what groups you are or could be a member of, which files you follow and which are available, along with the option to create or upload new files to a group or network. A network is all the people in your institution - you can also create external networks so that people outside of your institution can connect with it, which is useful for involving parents and caregivers.
- Apps is where you can see what apps you could install to make your Yammer experience richer and more fun.
- Edit profile lets you add to your Yammer profile in more detail. You can add a picture, your other social networking contact details and even integrate your twitter updates.
- Simply follow the step by step instructions for each of these additional functions. Spending a little time exploring these features will give you confidence and probably start to generate ideas as to how you might use Yammer in your education institution.
3. The Basics of Connecting and Communicating with Yammer
Your home screen is where you post general updates to your whole network. They will be ‘public’ within your Office 365 institution tenancy, which means that everyone in your institution who joins Yammer will be able to see them.
Keeping in touch by posting and following updates
- Open up your Yammer home screen by selecting Yammer from the blue toolbar at the top of your Office 365 homepage. Your screen will look similar to this:

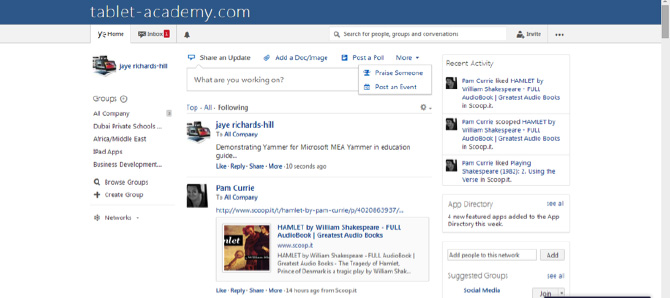
- There are different options along the top of the page. Type your update in the Share an Update box. When you are finished, simply select Post and your message will be published.
- You can add documents, images and other files to your messages.
- Remember to #hashtag keywords in your posts so that they can be found by searches.
- Polls are useful for quick feedback on a topic or item.
- You also get an option to notify specific people. Entering their names means they get a message informing them of your post. This is a useful function if your Yammer feed is particularly busy.
- Selecting the More tab opens up a drop-down menu with additional functions, which let you publicly praise someone or add upcoming events you’d like to notify other users about.
- The person being praised has a message published about their achievement to all users in the whole institution, as indicated by the arrow:

- Events can be posted by clicking on the option in the same drop-down menu and following the step-by-step instructions.
- Every update message, praise or event that is posted gives users options for responding to that post. The options are listed across the bottom of the update message - Like, Reply, Share and More.
- Liking a post activates a thumbs up icon and opens up a box in which you can type a message to go with your Like. You also get an option to deactivate your Like should you change your mind later!
- Reply lets you type in a comment.
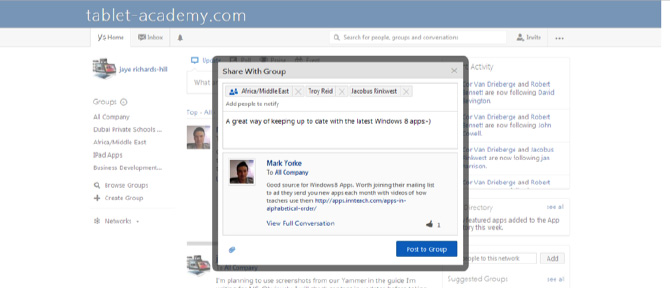
- Share lets you send out the update again to everyone in your institution (or just selected users and groups) along with a comment and an attachment if you choose. The Share screen should look like something this one:
- You also get an option to look at the entire conversation which might have taken place following an update, including the Likes and Praise and any other attachments that have been made.
- Selecting More opens a drop-down menu with other functions. It looks like this:
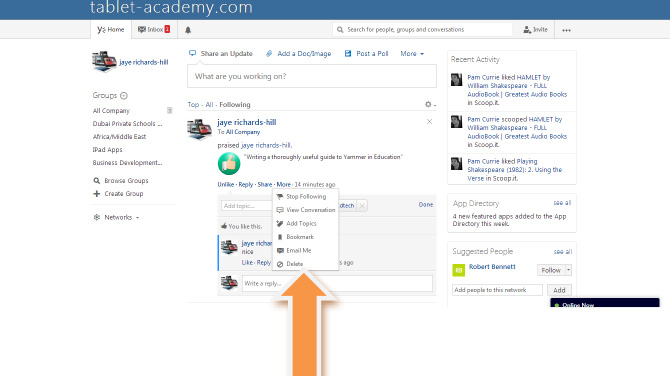
- Explore these additional functions. You can tag updates (useful for later searches), email them to yourself and others, delete them from your own Yammer stream, or even stop following the person who posted the update.
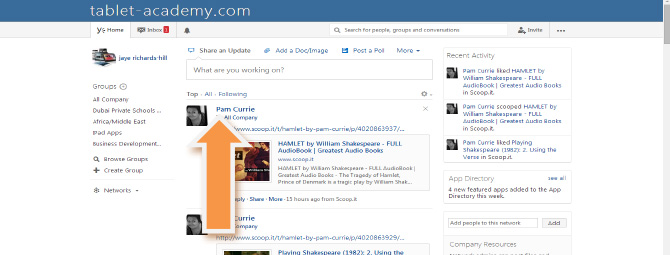
You can choose between three Yammer feeds by selecting any of the options that are displayed under the update text box on your Yammer home screen. These options are:
- Top - these are the most relevant updates to you (Yammer decides this based on your own updates)
- All - this feed has every update from all users in your institution
- Following - this feed contains updates from those users you have chosen to follow (read more on following and being followed later in this guide)
The arrow in the following screenshot indicates where to find these three options:
- If you only want to post an update to members of a group you have joined, then select the group from the list on the left of your Yammer home screen and type your update there.
- Posting from a group page means that your update will only appear in the feed for that particular group and not the all institution feed.
Inviting other people from your institution to connect and collaborate using Yammer
- From your Yammer home screen, click on the Invite button at the top right of the screen.
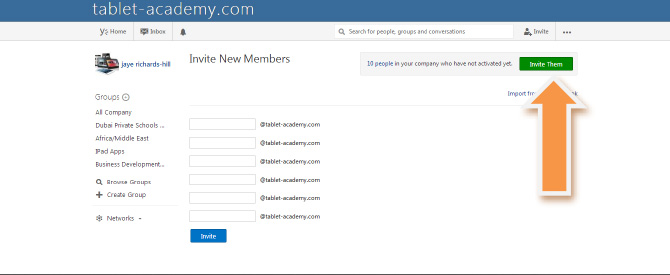
- Yammer shows how many users from your institution have not yet signed up to use the service. Click on the green Invite Them box (indicated by the arrow in the next screenshot) to bring up the list of these users.
- Select those users from the list you’d like to invite to use Yammer and they will receive a notification message with instructions on how to join up.
- You can then start to follow them as soon as they sign in.
Boost your personal learning network by following other users from your institution
Although you can see the Yammer activity of everyone in your organisation by simply selecting All from the three activity stream options, one of the really fun features of Yammer is that you can choose to follow those users in your institution who are particularly interesting or are friends or close colleagues.
Following other Yammer users is quick and easy.
- Click on the icon that looks like three dots at the top right of the screen. This opens a drop-down menu with some more functions and options. It will look something like this:
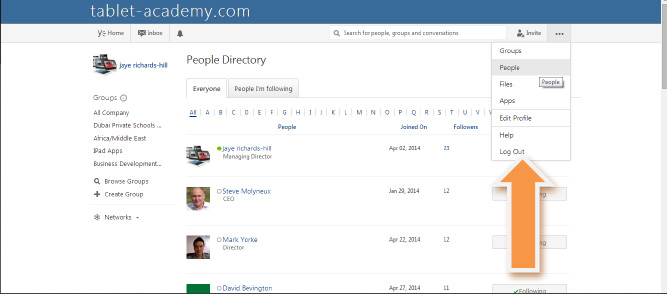
- Selecting People brings up a list of everyone in your intuition who is using Yammer.
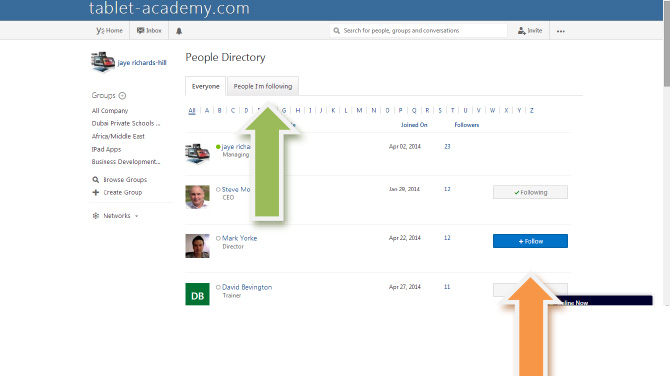
- You follow people by clicking on Follow to the right side of the user’s name, as indicated by the orange arrow in the below screenshot. When you select someone to follow, you will get a message confirming that your follow request has been successful.
- Selecting the People I’m Following tab (indicated by the green arrow in the below screenshot) will show a list of everyone you are following in your institution.
4. Connecting and Collaborating in Yammer through Groups and Networks
Posting messages and following those from all of the users in your institution is great, but sometimes it is useful to narrow this activity stream down a little. This is where the Groups feature is very useful. You can set up and join groups for:
- Special topics of interest
- People working together on projects or assignments
- Departments and faculties
- Management and senior leadership teams
- Collaborating on documents and other files
Joining an existing group is easy - simply use the Browse Groups function on the left side of your home screen to search through the list of groups. Select the group or groups you wish to follow.
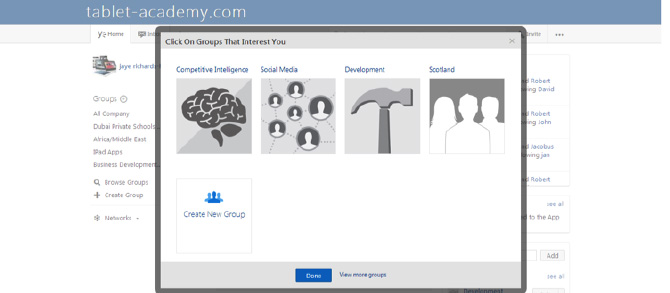
- The popup window also gives you the option to create a new group.
- Alternatively, you can create new groups by using the + Create Group command on the left side of your Yammer home screen, or by selecting the + icon next to the Groups heading on the left of the screen.
- Using any of these three options will bring up a new popup window with step-by-step instructions to help you set up your new Yammer Group.
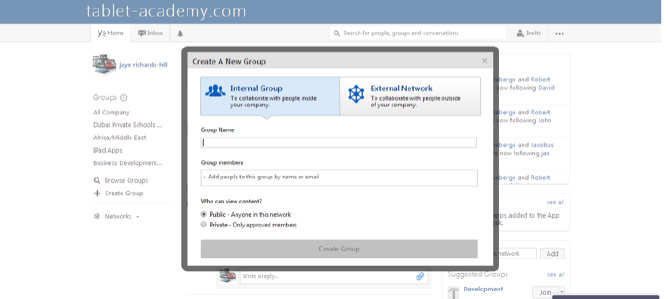
- Decide if it is to be for internal or external Yammer users, name your new Group and invite members. You can also choose to make your Group private for invited members only.
- Once your new Group has been created, it will appear in the list on the left of your home screen.
Using Networks to make connections beyond your own education institution
Sometimes you might want to share information with Yammer users outside of your education institution. You can do this by creating Networks, which allow you to communicate safely with invited users. Such networks might be for:
- Parents and caregivers
- Suppliers.
- Area or district education officials
- Local community networks (employers, business sponsors and other support services)
Creating Networks is also easy. Click on Create a New Network on the left of your home screen, and a popup window will appear. You will then be able to select the option to create an external network.
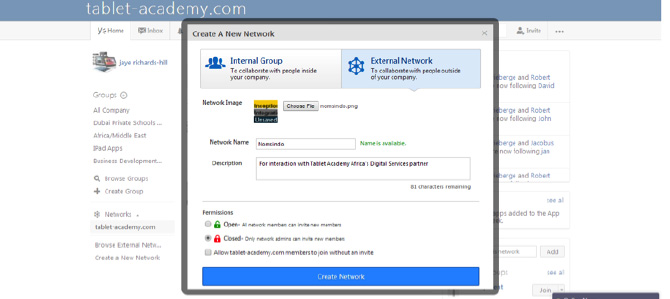
- Enter the name and other information and chose privacy options for your network.
- Select Create Network and it will be set up for you.
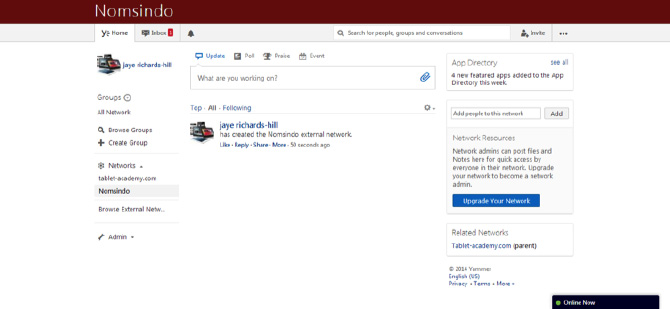
- The new Network will have all of the same functions and features that your main institution network has.
- It will appear in the list of Networks in the menu on the left of your home page.
- From here you will be able to select which Network to work within.
- Your main institution network is the Parent for all other Networks you set up.
5. More ways to Connect, Communicate and Collaborate
Your Yammer homepage has additional information and help for you down the right side of the screen.
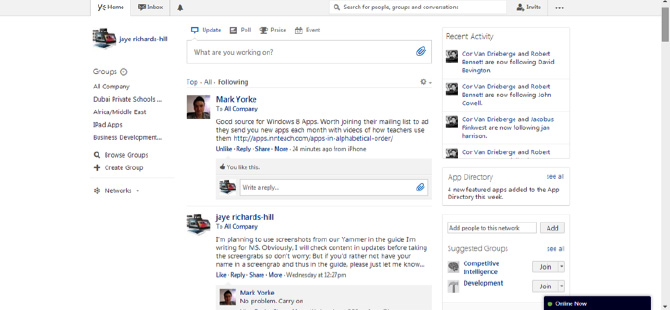
- Recent Activity gives you the latest information about who has joined Yammer and who has followed who in your institution.
- Recent Activity also lets you know what apps have been installed, which groups have been set up and who has ‘liked’ Yammer posts. There is a scroll bar on the right side of this window.
- App Directory gives you up to date information about new apps and a full list of all available apps to download.
- Add People is where you can quickly invite users in your institution who are not on Yammer to sign up and join in.
- The Suggested Groups window suggests groups you might want to join from the list of groups within your organisation.
- Selecting the Online Now tab opens up a window showing you which of the people you are following is active and using Yammer at that moment. A green dot next to their name indicates that they are online.
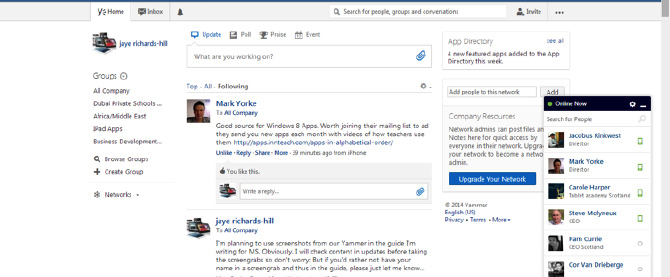
- The cell phone icon indicates that they have Yammer on their cell phones working for messages.
- Select one of your contacts and box appears to allow you to send them a private message.
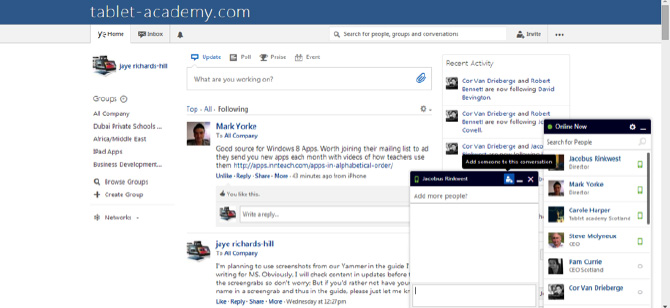
- Clicking on the People icon at the top of the messaging box lets you add others to the private message. In this way you can start an instant message conversation with one or more of the people you follow on Yammer.
Yammer is becoming integrated throughout Office 365. You can even use it to share documents and files straight from where you are working on them.
- Open your file in a SharePoint group or from your OneDrive. Click on the three dots to the right of the file name and a popup window will open. The arrow indicates the command options available for this particular file:
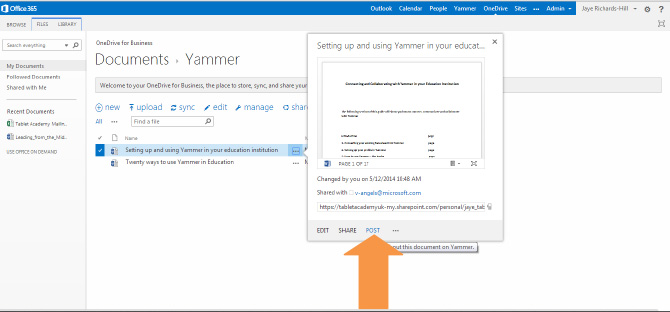
- If you select Post you will be able to share the document with individuals, groups, networks or your whole institution.
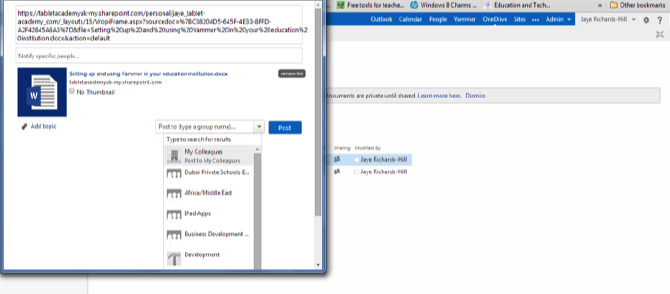
- This is another way in which Yammer can be used to connect, communicate and collaborate with others both inside and outside of your institution to help you complete important tasks.
This guide has covered the basics for setting up and starting to use Yammer. Spend some time exploring the various functions and features, and have a look at some of the ideas for how you might use Yammer in your education institution, which are featured in the next guide.
Safe and secure social networking with Yammer - Further Reading
» Setting up and using Yammer» 20 ways to use Yammer in Education
Download the full guide