| |
Map
Have you ever been lost? How did you find your way to where you needed to go? Sometimes, getting lost is easy, especially in a new place. How can people avoid getting lost? Some people ask for directions, while others use maps. What do maps look like? What information is usually on a map? What places do you see on maps?
 |
Plan It |
| |
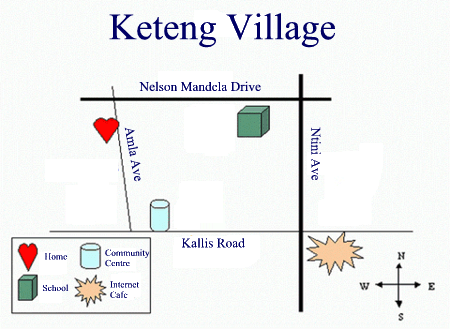
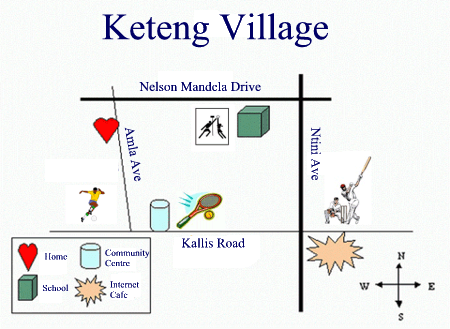
Make a map that shows visitors how to get to the sport venues in your community. Look at the following example:
Think about the following questions, and discuss your ideas with your
partner. You might want to write your ideas on a sheet of paper. You also can draw what you want your map to look like.
- Where do you like to go in your community? What other places might
visitors like to see or need to go to?
- Where is each place located? What street is each place on?
- Which main streets should put on your map? Which direction does each street run?
- What other community landmarks might you put on your map to help people find their way to the places on your map?
For help on how to do certain skills, look at the following groups in the Help Guide:
- Graphics Group 4: Getting to Know the Graphics Draw Software (NOTE: This group name will change depending on the Help Guide version being used.)
- Graphics Group 5: Using the Drawing Tools
- Graphics Group 6: Changing the Look of Lines and Shapes
- Graphics Group 7: Adding Words to Your Drawings
- Word Processing Group 5: Adding Pictures to Your Pages
|
| |
|
 |
Do It |
| |
- Launch the word processing software, and open a new, blank document.
- Make a text box, and type the name of your community. Change the look of the words, and move the text box wherever you want on the page.
- Draw a line for each street on your map. Be sure to draw the lines in the correct direction. Also, move and cross the lines so they look like the
actual streets in your community.
- Change the width and the colour of the lines to show a difference
between small side streets and wide main streets.
- Make a text box next to one of the streets. Then, copy and paste the text box to make as many boxes as you need for your map. Move each box next to a street.
- Type the name of each street in the correct text box. Change the look of the street names however you wish.
- After you have put the text boxes where you want them, remove the borders and fill colours.
- Draw a different shape to stand for each of the fun or important places that visitors should go. Create some shapes if you want. Be sure to put the shape for each place next to the correct street!
- To help each shape look unique, add a different line and fill colour to each. You might also want to add a fill effect.
- How will visitors know what each shape means? You will need to make a legend that shows what place each shape stands for. In an empty area on your map, draw a rectangle for the legend’s outside border. Change the line and fill colour as needed.
- Copy and paste each of your map’s shapes inside the legend’s border. Make the shapes smaller if needed, and move them so they are lined up and evenly spaced in the legend area. (NOTE: You might want to zoom in so you can see better.)
- Make a text box next to each shape, and type the name of the place that each shape stands for. Change the look of the words, and delete the
borders and fill colours from the text boxes.
- Use arrows to make a map symbol, or compass rose, that shows which way is north, south, east, and west. Change the way the arrows look as needed.
- Save your work as directed.
|
| |
|
 |
Review It |
| |
Look over your map. Make sure it has the following elements:
- Name of your community
- Lines that stand for the different streets in your community
- Different-coloured shapes that stand for each place that a visitor might like to see or need to go to
- Text boxes with the street names
- Legend that explains what each shape stands for
- Directional arrows that point out which way is north, south, east, and west
If any elements are missing, add them now. If you want, make other changes, as well. Remember to save your work when you are finished.
|
| |
|
 |
Share It |
| |
Be prepared to discuss your answers to the following questions:
- Why did you decide to include the particular places and streets shown on your map?
- What features on your map make it easy for visitors to use?
- What other types of maps might you make? What skills and tools would you use again? What would you do differently the next time?
|
|
