Module 11
Applying Spreadsheets
Module 11
Seating Plan
At the beginning of a new school year, learning the names of all of
your new learners can be challenging. Learning learners’ names can
be even more difficult for substitute teachers who may need to teach your learners in your absence. What are some ways you can help a
substitute teacher know the names of the learenrs in your class?
One way is to create a seating plan spreadsheet.
![]() Plan It
Plan It
Create a seating chart spreadsheet with the names of the learners in your classroom. Look at the following example:

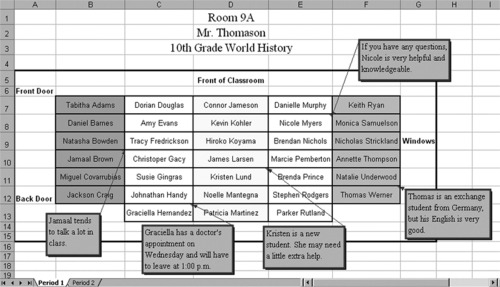
Seating Chart Worksheet Example
Think about the following questions, and if working with a partner, discuss your ideas. Writing your ideas on a sheet of paper and drawing a classroom seating diagram might be helpful.
- How many different classes of learners do you teach during the day? What general information about each class might a substitute teacher need to know? How many different seating chart worksheets might you want to create?
- How many learners are in each of your classes? How are the learners’ desks physically arranged in the classroom? How might you use the cells in a worksheet to show the arrangement of desks?
- What special information might you need to tell a substitute about
specific learners?
For help on how to do certain tasks, look at the following groups in the
Help Guide:
- Spreadsheet Group 2: Selecting Cells, Rows, and Columns
- Spreadsheet Group 3: Using Worksheets
- Spreadsheet Group 4: Adding and Working with Information
- Spreadsheet Group 5: Changing the Look of Information and Worksheets
![]() Do It
Do It
- Start the spreadsheet software, and open a new, blank worksheet.
- In the cells at the top of the worksheet, type any general information that the substitute teacher may need to know. For example, you may want to type your name, your class or room number, and the subject that you teach. Change the look of the information.
- Leave a blank row below the general information at the top of the
worksheet. Then, type the names of your learners in the cells below. Be certain to type the names in the cells that reflect where they actually sit in the classroom. Adjust the width of the columns as needed.
- Change the look of the learners’ names. You might also want to change the position, or alignment, of the names in the cells.
- Type labels that show the front of the classroom, the location of the doors and windows, and any other features. You may need to insert rows or columns first to create enough space for the labels. You might also want to cut the general information at the top of the worksheet and paste it into new cells so it is positioned properly.
- Insert comments or notes that provide helpful information about some of your learners. Be certain to delete any text that automatically appears in the comment box before you start typing. (For help, see Spreadsheet Skill 4.11: To type a comment in a worksheet cell.)
Challenge: Change the look of your comment boxes or note boxes. For example, you might change the font, pick a different border width and color, or add shading to the comment box. (See the Seating Chart Worksheet Period 1 Challenge Example at the end of this section.)
- Add borders and fill colors to the cells. Remember that the goal is to help this worksheet look like your classroom.
Challenge: Duplicate the worksheet and complete another seating chart for another class or period that you may teach. Replace the general information at the top of the worksheet and the learners’ names. (Note: Depending on class size, you may need to include more or fewer names.) You will also need to delete the old comments and add new comments about the learners. (See the Seating Chart Worksheet Period 2 Challenge Example at the end of this section.)
- Give your worksheet tabs new names that describe the information. Delete any unused worksheets.
- Save your work as directed.
Seating Chart Worksheet Period 1 Challenge Example

Seating Chart Worksheet Period 2 Challenge Example
![]() Review It
Review It
Look over your seating chart worksheet. Make sure it has the following
elements:
- General information about your class at the top of the worksheet
- Your learners’ names typed into cells that resemble the arrangement of desks in your classroom
- Helpful comments or notes about certain learners
- Labels, cell borders, and cell shading to help the worksheet diagram look more like your actual classroom
If any elements are missing, add them to the seating chart now. You should also make other desired changes. Remember to save your work when you are finished.
![]() Share It
Share It
Be prepared to discuss your answers to the following questions during
sharing time:
- How might the seating chart be helpful to a substitute teacher?
- How is this activity different from the first spreadsheet activity that you
completed? - What other sorts of diagrams might you create in a spreadsheet?
