Module 11
Applying Spreadsheets
Module 11
Annotated Images
Using images in learning is an effective way of supporting explanations. Have you used images to enhance learning? How might you make the use of images more interactive? The spreadsheets structure of cells and the commenting feature can combine to offer you the opportunity to create annotated images.
![]() Plan It
Plan It
Create a spreadsheet with an annotated image. Look at the following example:
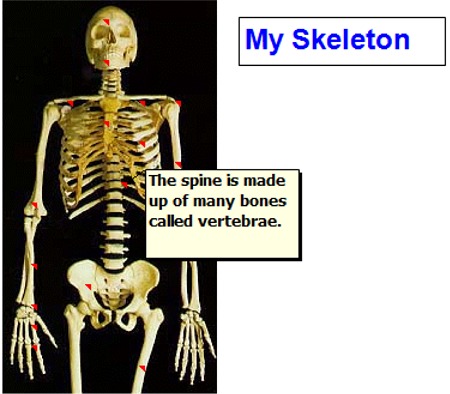
Annotated Image Example
Click here to see an example the annotated image in an Excel document.
Think about the following questions, and if working with a partner, discuss your ideas. Writing your ideas on a sheet of paper and drawing a table that shows how you might put the information in order might be helpful.
- What image would best lend itself to this kind of interactive use?
- What would you write in the comments in order to challenge learners' thinking and enhance learning?
For help on how to do certain tasks, look at the following groups in the
Help Guide:
- Spreadsheet Group 2: Selecting Cells, Rows, and Columns
- Spreadsheet Group 3: Using Worksheets
- Spreadsheet Group 5: Changing the Look of Information and Worksheets
- Spreadsheet Group 6: Organising Information
![]() Do It
Do It
- Start the spreadsheet software.
-
-
Set the margins to 0.
- Select all cells and resize the width to 1.5. The smaller your cell width and height, the easier it is to exactly place a label on the background picture.
- Save the spreadsheet. Remember to save your work at regular intervals.
- Insert a background picture on the sheet. From the Format menu select Sheet and background to insert the picture. The picture will be the focus of the activity. It should be of a good quality and size.
- Mask unwanted parts of the background. The picture will tile your sheet, so you need to mask out unwanted copies of it. To do this:
- Select the first column to hide. Hold Ctrl +Shift and press the right arrow key. From the Format menu choose column and then hide.
- Hold Ctrl +Shift and press the down arrow key. From the Format menu choose row and then hide.
- The extra rows and columns will now be hidden.
- Insert comments. The comments could be notes or questions, preferably not a "fill in the blank space" activity.
- Hide the gridlines. You can hide unwanted gridlines on the page.
- Save the file.
![]() Review It
Review It
Look over your completed annotated image. Make sure it has the following
elements:
- A suitably sized image
- Narrow columns and rows resulting in many gridline intersections
- Hidden unnecessary rows and columns
- Masked unnecessary image parts
- Inserted text in the comment fields
If any elements are missing, add them to the spreadsheet now. You should also make other desired changes. Remember to save your work when you are finished.
![]() Share It
Share It
Be prepared to discuss your answers to the following questions during
sharing time:
- How might the annotated images make teaching and learning more effective?
- In what other learning activities might you want to use annotated images? Why?
- How is this activity different from other spreadsheet activities that you
completed?
