Module 5
Applying Word Processing
Module 5
Diagram
A diagram is a picture with labels that name and explain the items shown in the picture. Diagrams can help learners understand various types of information. What types of diagrams have you seen? What
information was found in the diagrams? What topics might your
learners understand better if you used a diagram?
![]() Plan It
Plan It
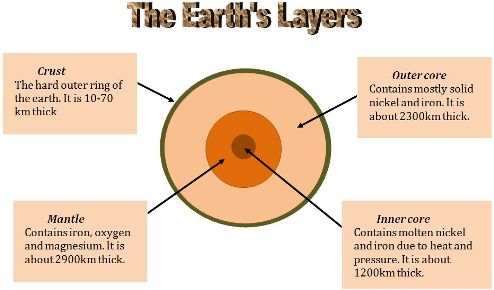
Create a diagram that you or another teacher can use to teach a specific topic. Look at the following example:

Diagram Example
Click here to see the diagram example as a Word document.
your ideas. Writing your ideas on a sheet of paper might be helpful.
- What specific topic do you want to feature in your diagram? How might this diagram help learners understand the subject better?
- What type of picture might you use in the diagram? Where might you
locate a picture that you can use? How might you use the computer to make your own picture? - What individual parts in the picture should be labeled? How might each part be explained or described so learners can understand?
For help on how to do certain tasks, look at the following groups in the Help Guide:
- Graphics Group 5: Using the Drawing Tools
- Graphics Group 6: Changing the Look of Lines and Shapes
- Graphics Group 7: Adding Words to Your Drawings
- Graphics Group 8: Working with Objects in Your Drawings
- Word Processing Group 5: Adding Pictures to Your Pages
- Word Processing Group 6: Designing Your Pages
![]() Do It
Do It
- Start the word processing software, and open a new, blank document.
- To help you size and place the objects in your diagram, make sure the rulers are shown. Also, turn on the page grid so it shows on the screen, and set the grid properties so that objects snap to the grid and to other objects. (For help, see Word Processing Skill 6.3: To use the page grid to place and size objects.)
- Add a picture in the desired location on the page. You might insert a clip art picture or use a picture that you copied from a Web site. (For help, see Word Processing Skill 5.1: To add pre-made computer pictures, or clip art, and Word Processing Skill 5.3: To add a picture you have copied from a Web site or another document.) Or if you prefer, you can use the drawing tools to create your own picture.
- Change the picture’s text wrapping, and resize and move the picture as needed. (Note: If you used the drawing tools to create your own picture, you may not need to change the text wrapping. However, you might need to resize and move the individual shapes and lines.)
- Add an artful title, such as WordArt or Fontwork, in an empty place in the diagram. Make sure the title explains what the diagram is. You might also change the text wrapping so you can easily move the artful title.
Challenge: Change the style, color, and shape of the artful title. (See the Challenge Example at the end of this section.)
- Create a text box for the first item you want to label. Type a word or phrase that labels the item. Then on the line below, type a sentence that explains or describes the item.
- Change the font, size, and color of the word or phrase that labels the item so that text stands out. Then, change the font, size, and color of the sentence that explains or describes the item. You might also want to change the alignment and line spacing.
- Fill the text box with color, and change the border width, color, and style.
Challenge: You might want to add a shadow effect or apply a light gradient to the text box. (Note: Adding a shadow effect to a text box may be challenging in OpenOffice.org Writer*.) (See the Challenge Example at the end of this section.)
- Copy and paste the text box as needed so you have one box for each item that you want to label. Move the boxes as needed, and refer to the rulers and the page grid to line up the boxes neatly.
- Change the label text and the descriptive sentences as required. You might want to make the boxes bigger or smaller, depending on the amount of information inside.
- Draw an arrow from each text box to the part of the diagram that you want to label. Change the style, width, and color of the arrows.
- When you have finished your diagram, hide the page grid. Then, save your work as directed.

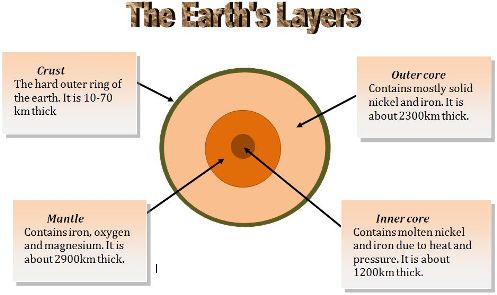
Diagram Challenge Example
Click here to see the diagram challenge example as a Word document.
![]() Review It
Review It
Look over your diagram. Make sure it has the following elements:
- An artful title that explains what the diagram is
- An appropriate picture for the topic
- Text boxes with labels that identify the individual parts in the picture and with sentences that describe or explain each part
- Arrows that connect each text box to the part that it labels
If any elements are missing, add them to the diagram now. You should also make other desired changes. Remember to save your work when you are
finished.
![]() Share It
Share It
Be prepared to discuss your answers to the following questions during
sharing time:
- How might diagrams improve learning?
- What specific topic might your learners understand better if they had a diagram?
- What might you do differently to create a diagram handout that learners can complete on their own?
- Of the new skills that you just learned, which is the most valuable? How might you use that skill in the future?
