Office 365 for Education
50 ways to connect your learning with your life with Office 365
Teachers and educators all over the world are using Microsoft Office 365 for learning, teaching and helping to make their administration more streamlined and efficient. You will be surprised at the many ways in which Office 365 can be a great tool for education and for enhancing learning and teaching.
This guide will give you 50 short ideas to try.
(Please note that some of the activities require you to have admin access to your institution Office 365 platform.)
A - Collaborating with Office 365 for Education
1. Set up a team site for your institution staff members
Office 365 core service: SharePoint sites
A team site for all of your staff is a great way to enhance communication and ensure that important announcements and other information are easily available to everyone.
You can add apps, store documents, host discussions and carry out surveys using the SharePoint tools as well as customising the appearance.
Spend some time looking at the SharePoint user guide in this series and explore a few of the functions available to make your staff team site a real powerhouse communication and productivity hub.
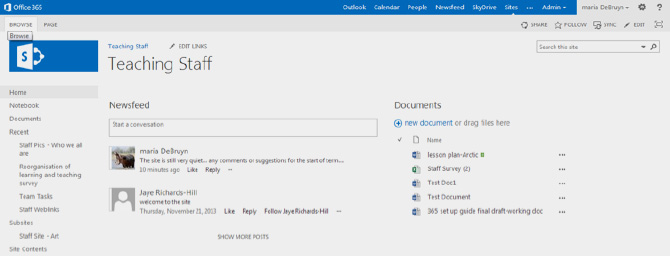
Here is an example of a school staff site in SharePoint:
2. Set up a public website
Office 365 core service: SharePoint
Your Office 365 tenancy lets you set up a public website using SharePoint. It’s easy - all you need to do is follow the step by step stages in the guide and on the site itself as you construct it by choosing a theme and then adding pictures, information and useful documents such as your student handbook.
Websites are easy to maintain and update in SharePoint, and are a great way of communicating with parents and caregivers, prospective students and anyone else who might be interested in what you are doing. You can even add plugins that link to your social media channels like Twitter and Facebook.
It’s a simple job to construct a great looking website for your education institution and SharePoint really does do most of the hard work for you!

3. Customise your website
Office 365 core service: SharePoint
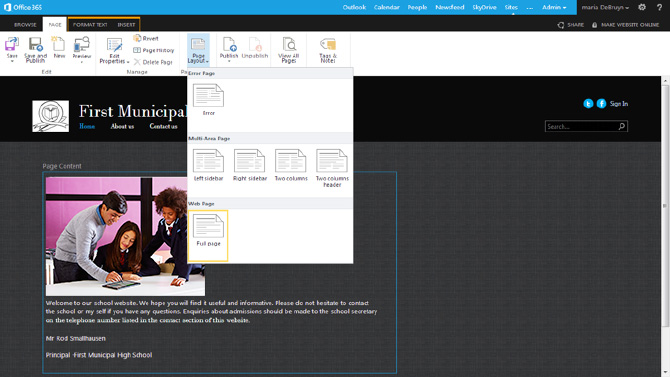
As you get used to working with SharePoint you will probably want to explore some of the more advanced functions. There are many ways in which you can customise your website, including changing the theme, colour scheme and page layout.
Just go to the settings icon (shaped like a wheel) at the top right of your screen and you will see options for site settings and changing the look. Take some time to explore what you can do with your website. Remember, you can always delete any changes you are not happy with.
You can really get to know what SharePoint websites can look like by spending some time exploring all the settings options and other tools.
4. Set up a team site for each of your classes
Office 365 core service: SharePoint
You can set up team sites for each of your classes using SharePoint.
These can be subsites from a main student subject site, and further subsites from these. A site hierarchy for the Life Sciences students might look something like this:
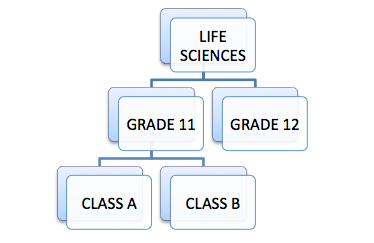
Subsites are easy to set up using SharePoint and they work the same as their parent site. Just follow our guide and explore your Office 365 SharePoint features. You can always delete anything you are not happy with.
A class site can keep everyone up to date with work and assessment progress using have pictures, a calendar, video, presentations etc.
SharePoint is great for organising your learning resources and keeping everything for each grade and class in one place so that the students can access them at any time and from anywhere. This can also be a great help to teachers by saving time and effort reproducing resources as each new academic year starts. Your sites become a fantastic source of materials for learning and teaching.
5. Create a community hub for your students
Office 365 core service: SharePoint
SharePoint lets you create community sites for groups of your institution’s users. Community sites host a discussion forum and provide other useful information. They are a great way of getting members to talk about things that concern them or topics they are interested in.
Schools and other education institutions can add apps to community sites and use them for surveys and polls. You can even include people outside your institution by adding them as external users, which is great for involving parents and caregivers.
Reward people who contribute with achievement badges and by using the reputation settings, and encourage student moderators to manage the discussions.
Have a look at this example, consider which tools you could include in your site and then go and explore your SharePoint!

6. Get your users to start blogging!
Office 365 core service: SharePoint
Did you know that SharePoint has a blog platform? All Office 365 for Education users can start and maintain their own blogs. These can be made visible to just a few invitees or your whole institution.
Blogs are great for sharing details of events, ideas and opinions, and other users can leave comments. Lively discussions will sometimes take place!
Blogs are also a great way of encouraging literacy through extended writing and reading - especially for traditionally reluctant groups of readers and writers.
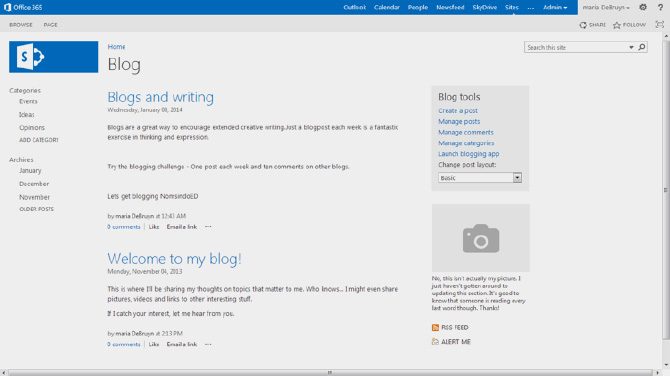
Have a look at this example, then try having a go at starting your own blog:
7. Use SharePoint as your new Learning Platform
Office 365 core services: SharePoint, OneDrive*, Outlook and Office Office Online**
Over the past few years, many schools and other education institutions have been making use of Virtual Leaning Environments (VLEs) and have used these for connecting, communicating and for Learning and Teaching activities.
Many institutions have found that the take-up and use of these sometimes expensive VLEs is very slow and patchy as they are sometimes over-complex and difficult to use. Office 365 with SharePoint is free to schools and can be the ideal managed learning platform.
The tools that come with the Office 365 for Education A2 Plan enable educators and learners to connect, collaborate and create in real time. Resources and contacts are easy to search for and find, and communication with people outside of your institution’s platform is made easy with email and Lync video conferencing all included. OneDrive gives all users a massive individual 25GB storage facility, perfect for individual learning resources, and users can share everything or just individual resources, sites and calendars with other users.
- Flip your classroom by hosting video and audio in your SharePoint sites for learners
- Create a lesson plan repository for your colleagues
- Have a bank of past exam papers and grade assessment exemplars for learners
- Safe and secure communication, particularly between students and staff
All your SharePoint sites work together to make up your Learning Platform and with email, instant messaging and video conferencing, there is no need to use any external tools or services.
*Formerly known as SkyDrive.
**Formerly known as Office Web Apps.
8. Bring in your parents and caregivers
Office 365 core services: SharePoint
Did you know that you can give access to your institution Office 365 platform to the parents and caregivers of your students? You can set up a community hub for them as well using SharePoint.
It’s easy to do - simply add them as new users, send them their passwords and login names, and get your students to show them the basics of using Office365.
All you need to do is set up a community site as described in number 4 of this guide but make it exclusively for the parents and caregivers. This lets them communicate with your institution and each other to share news and updates.
Your community site will become your parent and caregivers support group, answering questions for them and hopefully hosting some lively and interesting discussions.
B - Connecting with Office 365 for Education
9. Send an email message
Office 365 core service: Outlook.com*
Sending an email from Outlook.com is very easy. Just click on +new mail, and as you type in the name of the recipient, Outlook will offer you suggestions. Once you have entered the names of your recipients, type out the body of your message and add attachments such as documents or images if you need to. Click on send and your email will be delivered to the recipients.
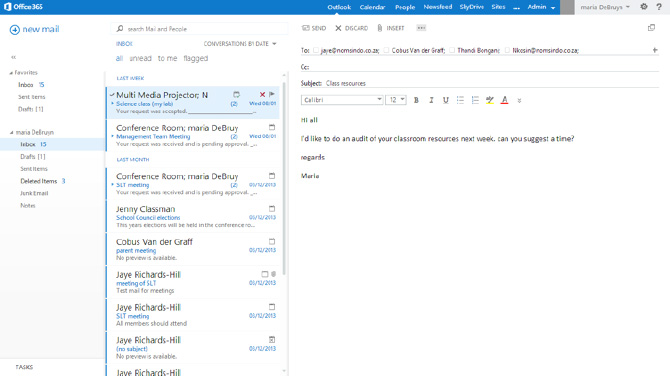
Take some time to explore Outlook.com and discover other useful email functions.
*Formerly known as Outlook Web App.
10. Make conference and meeting rooms available for booking
Office 365 core service: Exchange
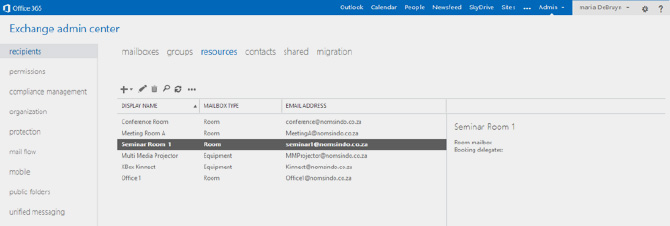
Use Exchange to set up a list of rooms that can be booked for meetings, seminars and workshops or for teaching classes in your institution.
These lists become visible when users set up meetings or schedule classes using the +new Item function in their Calendars.
You can add rooms to your list using the Resources tab in the Exchange Admin Centre. These will be presented as options to be booked when using Calendars.
11. Make shared resources available for booking
Office 365 core service: Exchange
As well as meeting and conference rooms, you can make useful teaching and learning resources available to be booked for classes and meetings.
Use the same function in the Exchange Admin Centre to add these shared resources. This function takes the hard work out of coordinating the use of your institution’s audio-visual resources, and is perfect for sharing the use of IT and science equipment and any electronic games consoles you might have.
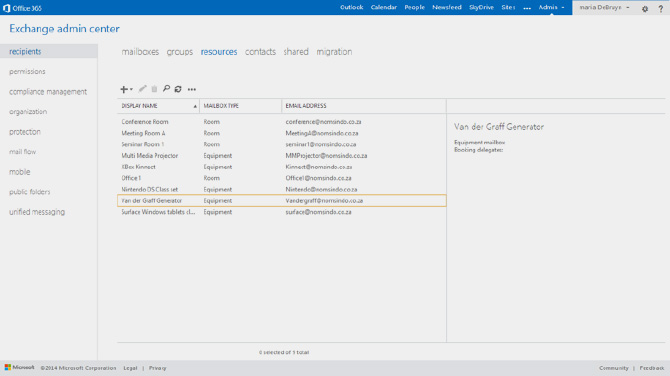
Set up your own lists and use Newsfeed and Outlook email to let your colleagues know that they can now book these resources using their Calendars.
12. Use Calendar to schedule meetings
Office 365 core service: Outlook Calendar
The Calendar in Office 365 is packed full of useful features. Scheduling meetings is made easy and can be done with just a few clicks. You can add an agenda and other documents to the invite and invitees are then notified by email.
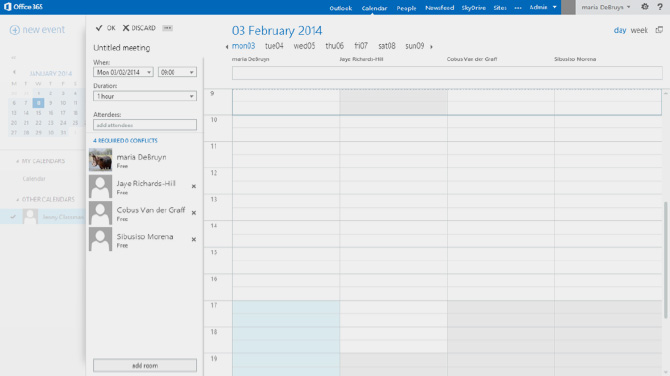
When you use the Scheduling Assistant, any clashes with invitee’s shared calendars are made visible to you while you are setting up your meeting, enabling you to pick the best time for maximum attendance.
You can see this on the screenshot of Scheduling Assistant in action. Notice the calendars of invitees are displayed side by side and any overlapping appointments are shown when you enter the date and time for your meeting:
Attendees are prompted to accept or decline the invitation, and also to give a reason for declining.
You can book a room for your meeting and any resources you might need. These will be reserved and shown as unavailable to anyone else who tries to book them during your meeting time slot.
Everything you need to be able to schedule, set up and run your meeting is all in one place with Office 365 Calendar.
13. Book resources for classes and meetings
Office 365 core service: Calendar
When you set up your equipment list using the Exchange Admin Centre, each piece of shared equipment is given an email address. You can use this email when you want to reserve shared resources.
To reserve your equipment using your Outlook calendar, click on +new Event and enter the first part of the email for the equipment then click on the search icon. This will bring up the full email address for the selected resources you need to book, which you can enter in the attendee’s line. Complete the date and time slots and click send, and your equipment is booked for you, preventing anyone else from booking it.
You can use Scheduling Assistant to see any other bookings for the selected resources.
It should look something like this:
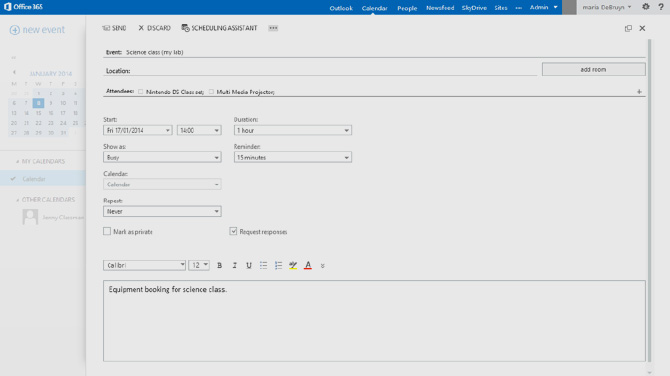
The details will appear in your Calendar as a reminder that you have booked these shared resources and will need to arrange collection and return. You will also receive a message confirming your booking.
14. Set up distribution lists in Exchange
Office 365 core service: Exchange, Outlook
Distribution lists are easy to set up and save you time when sending out email to multiple recipients or sharing sites, documents and other resources.
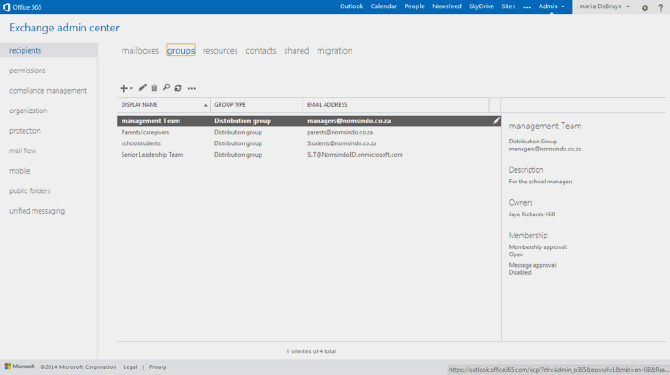
Go to Exchange, click on groups and then add users to the new distribution group you create. Give it a name and then click create. That’s all you have to do.
Try setting up a distribution group for your institution leadership team. Then when you need to send an email to all of the team in Outlook, simply start to type in the name of the newly created group in the recipient line in your email and the group name will appear. Your email will then be sent to all the members of the group, saving you from needing to select them all individually.
This function can be useful for sending email to multiple recipients who might otherwise miss somebody who should have had the email.
- Distribution groups can be set up from all provisioned users of your institution’s Office 365 platform. This could include external users like parents/caregivers.
- Use distribution groups for large numbers of similar users, for example Staff and Students.
- Smaller groups could include students in different grades and staff by department or faculty.
- You can also use these lists to share sites and documents with multiple users more quickly.
15. Set up email distribution lists in Outlook
Office 365 core service: Outlook, People
You can use Outlook to set up email distribution lists in a similar way to those you set up in Exchange, however, with Outlook the lists are only for email.
You can add any email addresses to your Outlook lists - they don’t have to be members of your institution Office 365 platform.
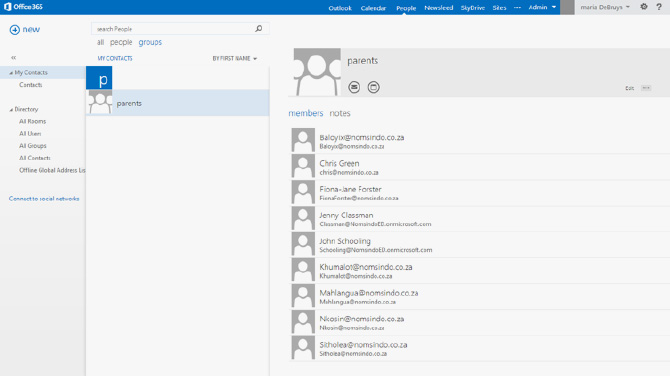
Go to the People tab on the main Office 365 toolbar. Click on +New and select Create group from the options which appear. Add the names of the group members and click save. Your group has now been created and is ready to use when sending email in Outlook.
(Note that you can only do this using your existing contacts, so you need to add the people to your contacts before starting to create the group.)
16. Add new contacts using a bulk upload
Office 365 core service: People, Outlook
Office 365 allows you to do bulk uploads of your contacts into Outlook. This is ideal for importing large lists like parents and caregivers.
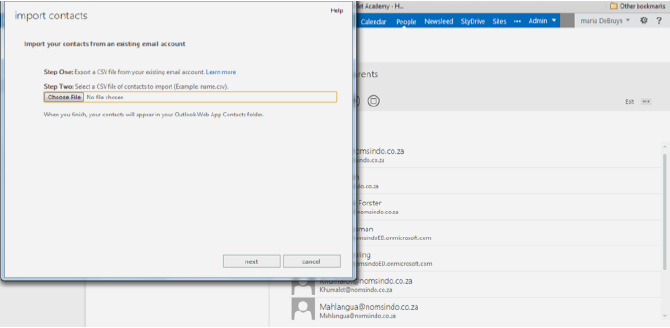
Provided your list is in the correct format as a .csv file, the process is quick and easy. Just click on the People tab from the main toolbar, go to the settings icon and open the drop-down menu. Click on the option to import contacts and follow the step-by-step instructions.
It’s a good idea to put an identifier in front of the names before you upload them, for example, PCG in front of all the parent/caregiver names. This makes it easier to identify them when you create your group by using this identifier as a search term.
Once you have uploaded your bulk list, you can create a distribution list as described previously.
17. Use a shared mailbox for a project
Office 365 core services: Admin dashboard, Outlook.com
As an admin of your Office 365 platform, you can create a shared mailbox so that a group of people can view and respond to email from a common mailbox. This is great when you are collaborating with others on a project. All the email concerning the project is collected together in one place, so you won’t have to hunt for it in your own email stream.
Everyone who has permission to access this shared mailbox can send replies to received email and the reply is sent from the mailbox, whatever name you give it, not the individual.
Just go to the users and groups function from your admin dashboard. You will see an option to set up mailboxes. Follow the simple set of instructions to set up your own project or team mailbox.
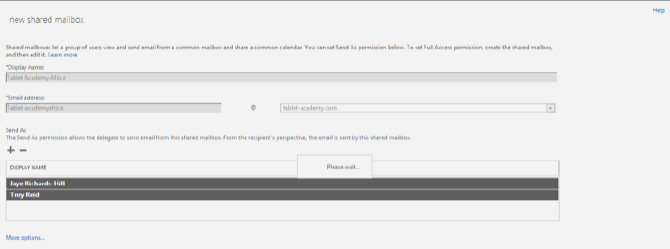
Add the new shared mailbox to your folders list in Outlook by right clicking on your name, then selecting Add new folder and searching for the mailbox. Once Outlook has found the new mailbox, click on it to make it appear in your folders list in Outlook.com. You can check it for shared mail and reply to enquiries.
The mailbox facility is a great way of improving communication and helping your project or working group to run more smoothly.
18. Share your calendar with colleagues
Office 365 core services: Outlook.com, Calendar
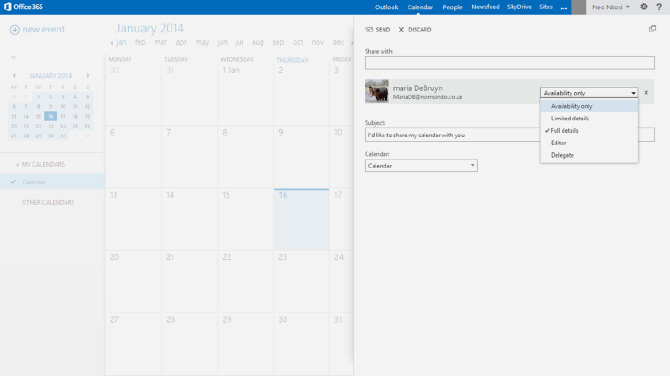
Did you know you could share your calendar? Office 365 makes it easy, and you can choose how much of the information is shared - all of it or only some.
In Outlook.com you can add multiple calendars of other users who have shared their calendars with you to view on one screen. This is extremely useful when it comes to scheduling tutorials, meetings and other events as you can overlay many people’s calendars to see when the most suitable time would be to arrange something. No more lengthy email threads trying to work out when everyone can make it!
Simply click on the share icon, choose who you’d like to share your calendar with and then set the level of information sharing.
19. Invite a guest expert into your classroom
Office 365 core service: Lync
You can use a Lync video conference to invite a ‘guest expert’ into your classroom - or even a grandparent to read to your class at story time.
Simply add your guest as a contact in People, and then schedule an online meeting with them using the Schedule meeting tool under their name. Your guest will get a link to the meeting and if they don’t have Lync on their computer they will be able to download it or use the Web App.
You will have a video and audio connection, and when projected onto your screen or whiteboard, it’s almost as if your ‘guest’ is there in the classroom with you.
Your students can ask questions and interact with their guest without the need for expensive and time-consuming trips and visits.

Lync is a really fantastic way of bringing the world into your classroom… and your classroom into the world.
20. Run a revision session using instant messaging
Office 365 core services: Instant messaging, Outlook, People, Calendar
Instant messaging is really useful when staff and students want to interact in a safe space. Encourage all your staff to consider running evening and weekend revision sessions before examinations and assessments.
It’s quick and easy to set up and run, and completely safe. Have a look at the guide for set up details and think about how you could use IM in your institution.
IM is a good way for students and teachers to communicate with each other and to offer basic student support outside of school hours, as it is safe and secure within your education institution Office 365 platform. There is no need to use any other social network or external email for communication between institution users.

21. Use a Quick Poll to check student engagement during Lync Meetings
Office 365 core services: Lync, Instant messaging
It can be difficult to keep students on task during Lync meetings. How do you really know if your hard work in setting up and running the meeting are really having the desired impact on their achievement?
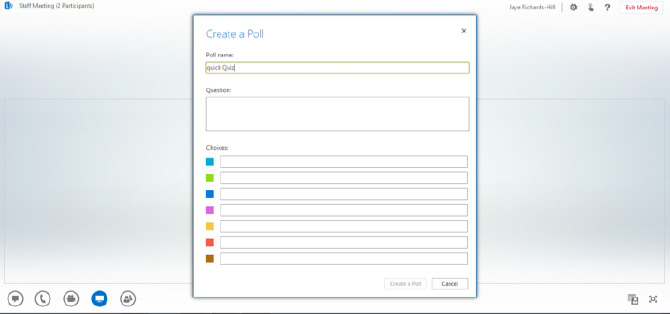
Using the Quick Poll feature you can check that your students are fully engaged with all your various shared resources.
Try running a series of questions in Quick Poll after you’ve worked through each shared video, PowerPoint or other content. This will check student learning and understanding, and keep them focused during the Lync session.
22. Use Q&A to organise questions to your guest
Office 365 core services: Lync, Instant messaging
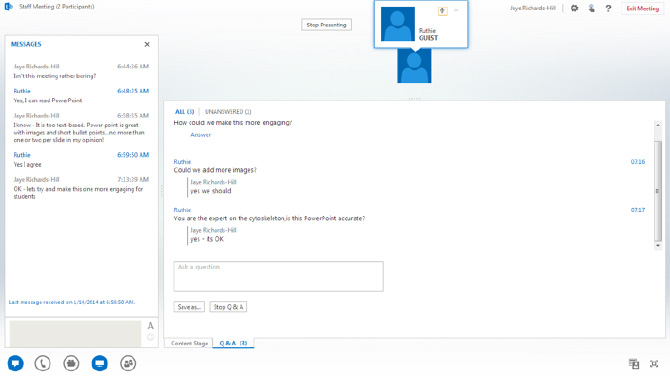
You’ve set up your Lync meeting and invited your guest expert to join. The questions on their presentation are coming in thick and fast via instant messaging, and you are struggling to help your guest answer them all.
Lync has a useful way of helping you to organise this activity so that all the questions get answered.
Using the Screen Options icon (fourth from the left at the bottom) you can start the Q&A window. This disables IM so that all questions have to be asked using Q&A instead.
This tool will help you make sure that all the questions your participants ask the guest expert will receive responses. Your participants can flip between the meeting presentation or other content and the Q&A to help them understand and ask further questions.
23. Share a PowerPoint presentation using Lync
Office 365 core services: Lync, Instant messaging
Try sharing a PowerPoint presentation on Lync during a meeting or revision session. All the features in the presentation will work in Lync. You can work through slides together using audio, make comments using instant messaging and circulate shared sets of notes afterwards.
Lync is great for running revision lessons, study support and professional development, and you could even use it to run an online conference.
24. Keep in touch with useful contacts and resources using Newsfeed
Office 365 core service: Newsfeed, SharePoint
As your institution’s SharePoint Online environment grows there could be thousands of sites, files and other content that may or may not be useful to every student or member of staff. Sometimes you stumble upon a really useful resource either by searching or by accident. You can keep track of it by following that content in your Newsfeed.
When you find such a resource, just click on Follow and every update will appear in your Newsfeed stream without you needing to go searching for it.
Similarly, you can set up a Links App in one of your SharePoint sites to keep a list of links to any useful websites you come across.
25. Use the Outlook.com on any mobile device
Office 365 core service: Outlook.com
When a school, college or university is using shared devices such as tablets, it isn’t always possible to personally configure the applications for a particular user.
This is where Office Online really come into its own. Outlook.com on mobile devices is excellent and will automatically switch format based on the type of device you’re using, whether it’s a cell phone, tablet or desktop PC.
It also runs on any operating system so whatever device you have, you’ll have no problems accessing your email.
26. #Social #networking on Office 365
Office 365 core services: SharePoint, Newsfeed
The humble # symbol probably never thought it would get such exposure before Twitter launched, but now the #hashtag is king, with @mentions and ‘likes’ not far behind.
In SharePoint Online you can use this familiar social networking feature to share content and conversations with others in your institution and follow them by searching in your Newsfeed.
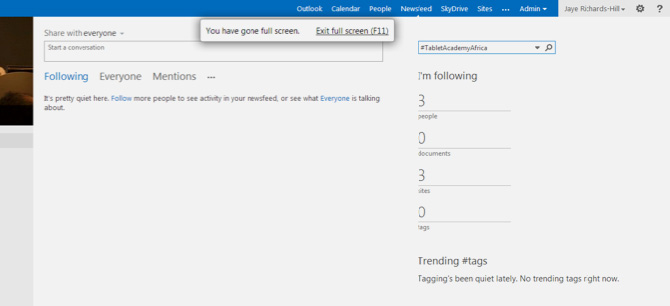
Just remember to tag your content and conversations using a #hashtag so that they can be easily found when searching.
C - Create with Office 365 for Education
27. Work on a lesson plan with colleagues in other schools
Office 365 core services: Lync, IM, Office Online
Connecting with Lync is a quick and easy way to collaborate with colleagues on lesson plans. It helps you connect with subject advisors and colleagues teaching similar grades and subject areas.
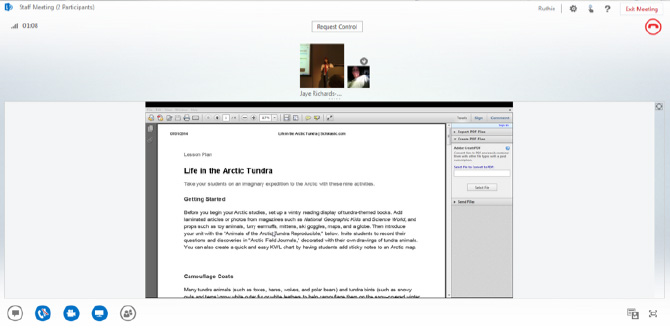
Simply put the ideas you have for your lesson into a Word doc or PowerPoint presentation and share with everyone in Lync. Work together to build the lesson plan… and watch the creativity flow!
28. Start to go paperless with OneNote
Office 365 core services: OneNote Online, OneDrive
OneNote Online in Office 365 for Education can be a very useful tool for organising almost any set of resources. If you have a class where all of the students have tablet devices, netbooks or laptops, you could consider going paperless with that class.
Show your students how to set up a Workbook using OneNote Online, which they can access using OneDrive. Their Workbooks could initially have a selection of main sections for all the types of work done.
You can see an example of a basic design here:

Each student than shares their OneNote Workbook with you, allowing you access to all their notes and resources. You can set and mark homework and assignments, and return these with individual feedback.
- Students can start to add resources and other sections as they get used to working with OneNote.
- They can take notes in class and add to these at home or from any location.
- They will build up a complete course portfolio of resources, which will be very useful when exam time arrives.
- No more worries about organising notes, losing printed hand-outs or missing homework - everything is all together in one place.
- If the students have the desktop version of OneNote they can utilise the full range of OneNote features to further enrich their Workbooks.
- There are no problems when switching between OneNote Online and the desktop version - Office 365 automatically syncs any changes so Workbooks are always up to date.
29. Try using OneNote for student ePortfolios
Office 365 core service: OneNote Online
Encourage your students to start and maintain an ePortfolio of their achievements using OneNote.
OneNote Online is great for organising resources into workbooks, sections and pages but you might want your students to reflect on how they can use this structure to organise their evidence of progress and achievement in a way that shows them being reflective learners who use feedback and peer assessment as well as their own achievements. It is a useful skill for students to be able to develop and maintain an ePortfolio that will help them acquire self-regulation skills, enable them to become autonomous learners and equip them with skills to be able to reflect upon their learning practices and achievements.
As not all of the children in your class have the full version of OneNote at home, remember that you need to use only the features available in OneNote Online, although many of them will be able to use the full version to make their ePortfolios even better.
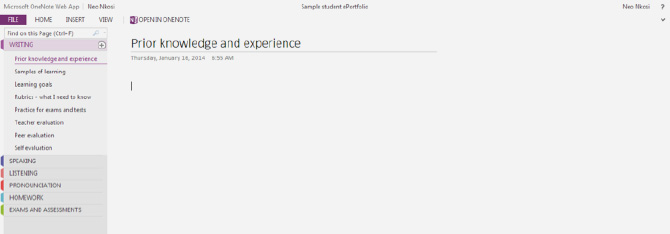
You could use the following structure for the sections:
(a) Reading (b) Writing (c) Speaking (d) Listening (e) Pronunciation (f) Homework (g) Exams
OneNote will give them different colours so that they stand out from each other.
Then you could use the following pages in each of the sections and create an example template for your students to use when setting up their own ePortfolios:
- Prior knowledge/experience
- Samples of learning
- Learning goals
- Rubrics - assessment criteria
- Practice for exams tests and quizzes
- Teacher evaluation
- Peer evaluation
- Self-evaluation
This powerful organisational facility makes OneNote the perfect ePortfolio solution for your students.
30. Staff Professional Development ePortfolios
Office 365 core services: OneNote Online, OneDrive
As well as student ePortfolios, OneNote Online is perfect for use as a teacher’s professional development ePortfolio.
Use the sections and pages to record all development activity and reflective analysis of lessons and other professional interactions.
Record not only courses, workshops and conferences, but also become a reflective practitioner by thinking about how this activity has impacted you and will improve learning and teaching in your classes. Remember to record these reflections in some way in the ePortfolio.
31. OneNote - Your virtual binder
Office 365 core service: OneNote Online
OneNote is a great place to store your resources for all of the classes you teach. It can become your virtual binder’, but one that is editable, changeable, dynamic and shareable - either through Office 365 or by email. You can clip content from the web, PowerPoint presentations, email messages or documents, and use this material in your lesson plans.
Using it in class with a projector and stylus, it becomes your whiteboard as well, and you can save anything you write, type or draw and distribute it to your students after class.
32. Use Excel Online to collect data
Office 365 core services: Excel Online, OneDrive
Excel Online is perfect for collecting and organising data on the go using a tablet device or even a smartphone.
Try using Excel Online next time you are doing a practical session or experiment where you need to note down data and results.
Your students can open their Excel spreadsheets in the more powerful desktop version of Excel if they need to use the increased functionality to analyse their data and present it in graphs or diagrams.
Office 365 will sync any changes you make automatically for you, so you don’t need to remember to do this.
Your students can then share their Excel spreadsheets with each other, and combine them into one full class version.
33. Conduct a face to face opinion poll or survey using Excel Online
Office 365 core service: Excel Online, OneDrive.
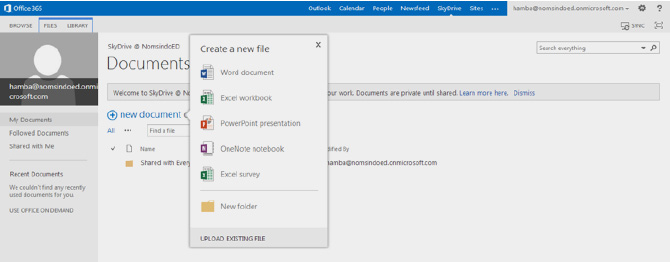
The survey tool in Excel Online is really simple to use and easy to set up.
You can use this tool when your students need to collect data for projects and assignments. Conducting face to face interviews using their Excel survey to input the data as they collect it is a great way of gathering useful information.
Tablet devices make this task much easier and completely mobile.
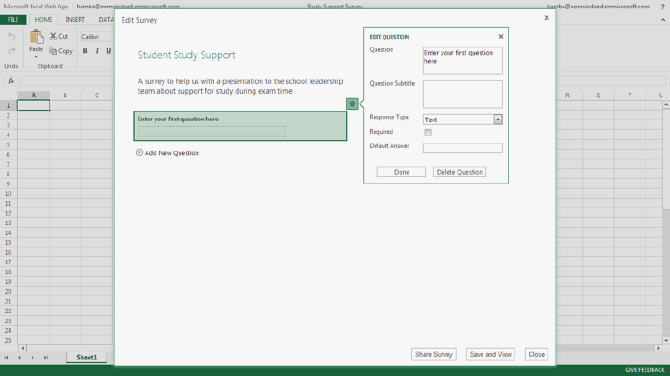
All the data can be analysed and presented in graphs or diagrams using Excel Online or by using the more powerful data analysis tools on the full desktop version of Excel.
Your students can also share surveys or polls with large numbers of their contacts by email to increase the amount of data they collect, which makes their final data analysis and conclusions more accurate.
34. Work with colleagues on a lesson plan in real time
Office 365 core services: Word Online, OneDrive
Office 365 has an amazing set of tools for collaboration and creation. Office Online lets you collaborate with other users in real time on shared documents. Office 365 even tells you who is working with you and you can see the changes they are making as they are happening!
This is a great way to work together when it is impossible for everyone to be in the same location. Simply share the document you want to work on collaboratively and open it in OneDrive or one of your SharePoint sites, and work together online.

Show your students and colleagues how this works. It can be really useful if you want students to work together on projects and assignments at home.
You could even get together with other educators to build up a shared lesson plan bank in OneDrive.
35. Work with students on Word docs to improve literacy
Office 365 core services: Word Online, OneDrive
Try working with students on extended writing tasks using a shared Word document.
You can help them as they are writing by using Word Online in Office 365. Observing their writing and giving feedback while they are working is a powerful aid to literacy and improving extended writing skills.
Version history, another tool in Word, lets you look at the revisions over time on the document to monitor improvement. This can be good internal assessment evidence.
Working together allows real-time feedback, which is very powerful in helping students improve their work.
36. Use OneDrive as your virtual filing cabinet
Office 365 core service: OneDrive
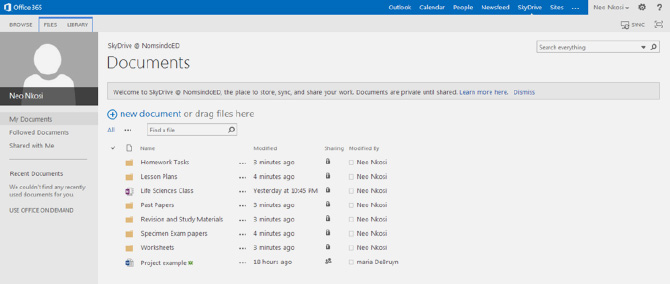
With its massive 25GB storage for each Office 365 user, OneDrive is perfect for storing and sharing resources with other educators. They don’t even need to be Office 365 users to be able to share your files.
Think of all the different resources you use in learning and teaching. How much time would it save if you worked with colleagues to create and share a common ‘bank’ which you could all use?
The list of resources you need for your classes throughout the year is substantial, including lesson plans, specimen assessments, mock examinations, past papers, worksheets, homework exercises, study and revision aids. So get together and spread the load by collaborating and sharing.
37. Use Word Online to take notes during online meetings
Office 365 core service: Word Online
Use Word Online to take notes during an online Lync meeting. These notes can be shared with everyone afterwards, and you can collaborate on the document.
This is perfect for recording tasks, workflow and agreed outcomes from the meeting.
As you get more used to working with Office 365, you can even collaborate in real time on the notes during the meeting. The document can be on your computer as well as your Lync meeting all the time.
Simply open a Word Online document in a separate tab. You can switch between the meeting and the Word doc to make your notes, and then share.
38. Publish student work online
Office 365 core services: Word, SharePoint
Publishing some of the excellent work your students produce is easy with Office 365 using the SharePoint components. This is a very effective way of raising students’ self esteem and letting them know how well they are doing in your class.
You can showcase their work on your public website by logging in and adding a page for student work. Upload, save and anyone will be able to see the wonderful work your students are completing.
You could create an online gallery using photographs of student artwork or a storybook collaboration involving many pupils. You could even publish your school’s student yearbook.
If you want to share, but within your institution rather than publicly, you can share individual pieces of work with all users, or collect them together in a SharePoint site or a blog. You then choose who you’d like to share this work with.
Office 365 makes sharing easy with just a few clicks.
39. Set up a document library
Office 365 core service: SharePoint
Have you thought about setting up document libraries in the SharePoint sites that you manage? It’s another great way of organising documents, presentations, spreadsheets and OneNote Workbooks.
Go to any of your SharePoint groups. If you are an administrator or owner, you will be able to add apps. Click on the settings icon (the wheel-shaped one at the top right of the screen) and select add an app from the drop-down menu. Choose Document Library from the available apps.
Name the document library and click create. Office 365 will set up your new library and add it to your site contents menu on the left of the screen.
You can add files by dragging and dropping or by clicking on +new file. Files can be renamed as necessary.
You can work with others in real time on your documents, just like elsewhere in Office 365, and you can follow documents and receive alerts when they are changed or altered.
Document libraries are just another fantastic way of organising your work in Office 365. Use them with classes, teams, colleagues and projects.
40. Create a signup sheet for parents’ evenings and meetings
Office 365 core services: Excel Online, OneDrive
Organising appointments for your parents’ meetings can be made much easier using Office Online.
Create a spreadsheet using Excel and share it with your students. They then get their parents or caregivers to choose a time slot and reserve it by entering their names on the spreadsheet.
You can even check the version history in the case of any disputes over entries.

Share the appointment signup sheet using the share function, send a link out by email, or put it into one of your SharePoint sites where the students will be able to access it.
No more bits of paper or lost appointment slips!
41. Use PowerPoint Online to create presentations
Office 365 core services: PowerPoint Online, OneDrive, SharePoint
PowerPoint Online lets you create great presentations from any location. Just sign in to Office 365, go to OneDrive or one of your SharePoint sites and start working on a new PowerPoint presentation. You can flip between PowerPoint Online and the more powerful desktop version if you have it, and any changes you make can be synced.
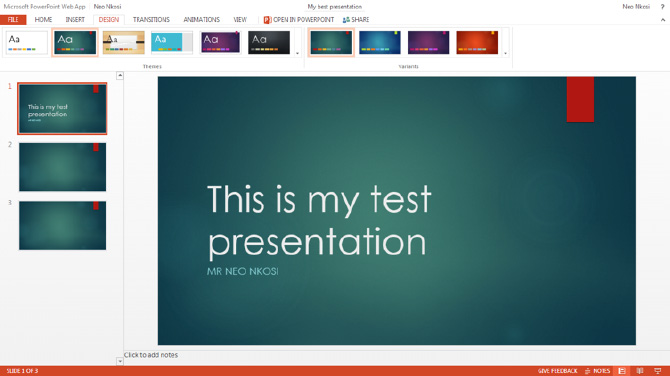
PowerPoint Online is very useful if you want to start working on a presentation while away from your desktop machine.
42. Customise your SharePoint sites
Office 365 core service: SharePoint
There are lots of different themes and all of them have colour controls so that you can change both the theme and its colour scheme. Just browse the site settings of the SharePoint site you want to redesign.
You can also change the layout of the site elements as you gain more confidence in working with SharePoint and even add custom web parts.
Have a go at customising your SharePoint sites with your institution’s colours!
D - Staff Professional Development with Office 365 for Education
43. Keep a daily reflective weblog
Office 365 core service: SharePoint
Publishing a blog post every day is a good way of getting yourself to reflect critically on your day-to-day work and the learning and teaching that takes place in your institution.
The blogging capabilities in SharePoint Online allow educators to quickly and easily write up their thoughts, ideas and showcase their progress in a secure environment. You can even customise the look and feel of the blogs to make them more appealing and more personal.
Take up the 365 challenge and write a short reflective blog post using your Office 365 SharePoint blog every day this year!
44. Set up a teacher learning community
Office 365 core services: SharePoint, Lync, Instant messaging
Teacher learning communities are excellent for sharing good practice and reflecting on learning and teaching activities.
Think about getting together with other educators and setting up a SharePoint Site to ‘host’ the group.
You could use instant messaging for ad hoc or scheduled chats about anything to do with your day to day teaching activity.
Share resources and schedule regular Lync meetings for face to face contact. Add useful resources to the site, along with links to professional development activities you have tried.
Getting together with other educators is a fantastic professional development activity that encourages reflective practice, self and peer evaluation and enhanced professionalism.
45. Collaborate on creating resources using Lync online meetings
Office365 core service: Lync, Instant messaging
Lync is a good way of getting together with colleagues to create shared resources. Using the presentation tools built into Lync as well as instant messaging, you can collaborate in real time to create documents, PowerPoint presentations and all sorts of other resources.
These educators are working though a PowerPoint presentation together:

46. Use Lync to host a staff development webinar
Office 365 core service: Lync, Outlook
With Lync colleagues from different locations can join in from the comfort of their own homes or places of work, and participate in meaningful staff development sessions without needing to travel large distances to meetings.
You can organise and host a staff development seminar using Lync, and it’s easy to set up using Outlook. A link is generated and sent to the invitees, who will then simply click on the link a short time before the scheduled start and follow the instructions.
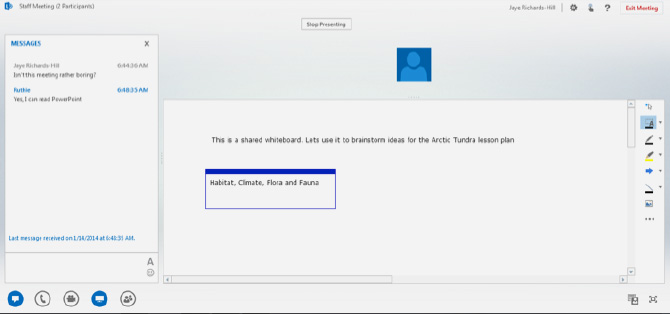
You can make shared notes in real time using the whiteboard so that everybody can see them and agree on the action points and follow-up activity.
47. Use OneDrive as a professional portfolio
Office 365 core services: OneDrive, Office Online
Records of qualifications and teacher professional development activities are often unrecorded or filed away somewhere. Poor record keeping can lead to teachers not being acknowledged for their professional development activity and achievements, and these records really should be immediately accessible. Despite this, teachers and educators can been neglectful of this duty because it is very time-consuming.
Office 365 can help solve this problem. Encourage each member of staff in your institution to set up and maintain a continuing professional development portfolio using OneDrive. In this way Office 365 can help save time on administrative tasks and free up more time for quality learning and teaching interactions.
Here are some ideas for carrying out and recording staff professional development activity over the course of the school year:
- Each teacher compiles a portfolio of evidence of achievement and details of all professional development activity, such as certificates. This is stored on OneDrive for easier access.
- Proof, in the form of photos and video, of a workshop attended can also be shared in an individual album to enhance this portfolio. This can be done using mobile devices and uploaded to OneDrive to ensure instant capturing of participation at the time.
- If video evidence is available it can be edited using Windows Movie Maker and stored as media in the same OneDrive folder. With 25GB of individual space, there will be plenty of room for this sort of evidence of achievement.
- To keep track of professional development through the year, the Task application in SharePoint and shared calendar entries in Outlook.com can be used to record time spent on certain activities following an annual professional development review between Senior Leadership and each member of staff.
The OneDrive professional portfolio can be shared with anyone as necessary. And because it’s in the cloud, it can be accessed at anytime anywhere.
48. Check out the Tip of the Day
As you become more used to working in Office 365, you will feel more confident in using some of the more advanced functions. A useful source of information is the Tip of the Day blog, which you can find at http://www.office365tipoftheday.com/
The writers of this blog give you a new tip each day for using Office 365 in new and better ways.
You can put a link to the blog on your home page or SharePoint Team Site, and encourage your team to explore the different uses for Office 365 in your institution.
49. Use the community
Office 365 core service: Office Admin Centre
Did you know that there is a vibrant community out there all using Office 365 in better and better ways by collaborating and sharing with each other?
You could join in with this online activity by following some of the helpful links you’ll find at the bottom right on your Office 365 Admin Centre screen.
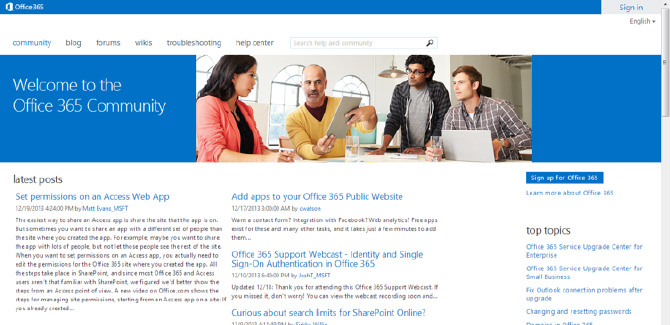
- You can read and ask questions on the Office 365 users’ blogs and wikis.
- You can also ask questions about Office 365 functionality on the forum.
- Join in the debate and let everyone know how you are using Office 365 in your institution and for learning and teaching.
Click on the links and you will be taken directly to the blog and the forums, where you can see how other users are using Office 365 to transform their education institution learning, teaching and administration.
50. ...and that’s your job!
We’ve given you 49 suggestions for using Office 365 for Education in your institution or classroom.
Now it’s over to you. Number 50 is your task, so think up another way to use Office 365 and take us over the finish line!