|
Step 1: Collect Ideas
Type your ideas in Word in any order, as they come to you. Put each idea on a new line.
Step 2: Switch to Outline View
Before you can work with the Outline tools, you need to switch to Outline View.
Choose the menu item View | Outline
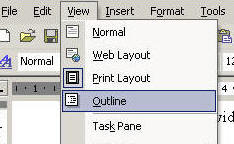
Note: this is a "hidden" menu item - the first time it is needed, you will have to hold your mouse over the menu for a few seconds to activate all the menu items; or you can click on the small arrows at the bottom of the menu.
Step 3: Identify your main headings
When you work with an outline, you are creating an information structure. The first thing you need to do, is to identify your main headings - about 4 or 5. Click anywhere in a line of text that will serve as a main heading, and click the "Promote to Heading 1" button.
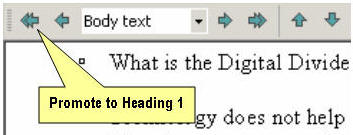
Main headings are tagged as "Heading 1" by Word; items which provide supporting information for a main heading (examples, explanations, details etc.) are tagged with "Heading 2", or lower levels. Ordinary paragraph text is tagged as "Body Text".
Step 4: Move your items under appropriate headings
As you look through your information, you will see which main headings items can be used to support. You can move your text items up or down within the outline by using the "Move up" or "Move down" buttons.

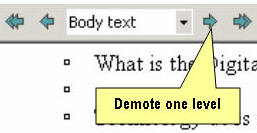
Step 5: Set an appropriate heading level for the sub-headings
Use the "Promote" and "Demote" buttons to tag your sub-headings with an appropriate heading level. You will usually need to first promote to Heading 1, then use the "Demote" button to set it to one level lower.
When you have finished organising your ideas, your outline could look like this:

Step 6: Export your outline to PowerPoint
When you are happy with your outline, you can export it so that it becomes as PowerPoint presentation.
Choose the menu item File | Send to | Microsoft PowerPoint
A new presentation will open. Note that each Heading 1 is on a new slide, as the Title, and that the Heading 2 and lower sub-headings appear as bullets.

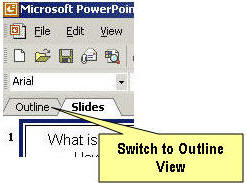
Step 7: Work with the outline tools in PowerPoint
You can adjust your outline in PowerPoint if necessary.
-
First switch to outline view
- Then drag the slide icon of a Heading 1, or the bullet for any other item. Drag up or down to change the position of the item in the presentation. Drag to the left to promote, and to the right to demote. If you drag an item as far as it can go to the left, it becomes the title of a new slide.

Step 8: Quickly formatting your presentation
You can quickly make your presentation look good by using the following:
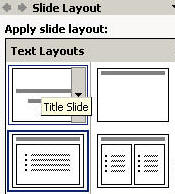
- Apply a slide layout to a specific slides, eg "Title Slide" for the first slide in the presentation.
Click on the slide you want to change, then choose the menu item
Format | Slide Layout
- Apply a slide design so as to give your presentation a "look", with particular colours, fonts, etc.

|