|
To save a file (to give it a name
and store it on disk)
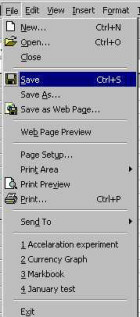
Click on File
Click on Save (see
example to the right)
or
Click on the File Save icon


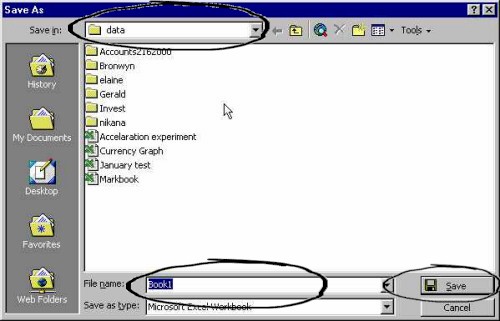
The pop-up screen for saving a file is very
similar to the pop-up screen for opening a file.

Check in the Save in:
line to make sure that you are saving the file in the correct
folder.
Click in the File name: box to type
in a descriptive file name of your choice. Notice that Book1
will be the file name offered to you, but this is not a very
useful (descriptive) file name.
Click on Save
You use File Save
- to give the file a name and save
it to disk for the first time
- once you have already given the
file a name and you just wish to update it.
Use File Save As if you
wish to change the name or location.
File Save
As
You use File Save As
- to save the file under
a different name - in other words, to make a copy
of a file and give the copy a different name e.g. you have
file called 2000 Markbook and
you want to keep it. However, you want to use the same format
of that document when typing another test. You open the
2000 Markbook file and use File
Save As to change the name to something
like 2001 Markbook. You can now
make changes to the workbook and save them under the new
name (2001 Markbook).
- to save a file in a different
location (a different folder or disk drive e.g.
saving to the A: drive - the stiffy disk).
To choose a different file
name:
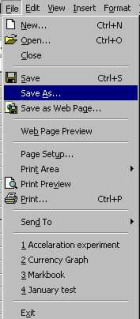
Click on File
Click on Save As
(see example below)

Once the pop-up screen appears, the procedure
from this point is exactly the same as for the File Save
routine, except that you give the file a different file
name.
To choose a different folder:
You will most probably be offered a folder
like My Documents in which to save the file.
If you wish to save the file in a different folder.
Click on File
Click on Save As
(see example to the below)

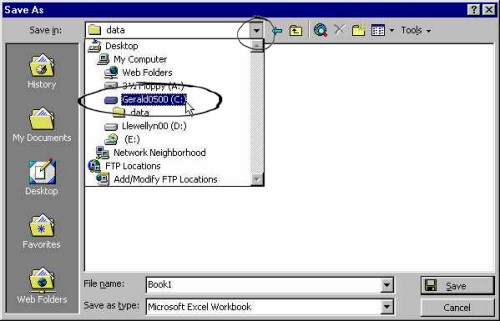
Click on the little black down
arrow  to the right of the Save In: box.
The available drives and/or folders will appear in a pull
down menu (see image below).
In this explanation we will assume that
you want to save the file in a folder called Data.
Follow the explanation to see how to find the folder.
Once you have the pull down menu and
options of drives and folders, select the drive in which the
folder is to be found. We have selected the C: drive
below. We therefore click once on (C:) -
the words before the (C:) are the name of
the drive and will be different in your case.

You now see a list of folders that are available
on the C: drive (see below). In our example, we see the Data
folder in the list. We therefore click on Data
and then click on Open (or just
double click on Data).

In the Data folder
there are a list of folders and files (see below). To save
the file in this folder, you now click on the File
name: box and type in the name. Then click on
the Save button.

If
you forget to save before closing the file
Note: You should normally save your work
to disk before closing a programme. If you do not do this,
you will lose your work. If you have accidentally forgotten
to save your work, Excel will notice this and you will be
asked whether you want to save it. the following pop-up screen
appears.

Click on Yes if you want
to save the work. A save pop-up screen appears.
If you do not want to save the work, click on No.
If you do not want to close (exit) Excel, click on Cancel.
|